Showing posts with label Halloween. Show all posts

Tuesday, March 3, 2015

Miss Frizzle Goes to Kindergarten


     Yesterday was Dr. Seuss' birthday, and in celebration of that day, my daughter's school encouraged kids to dress up as their favorite book character.  Initially Monkey wanted to be Elsa or Ana (of course), but I tried to emphasize book characters.  Yes, I realize there are book versions of the movie now, but I really wanted to encourage something that was at least a book before it was a movie.  After many suggestions and vetoes we both decided on Miss Frizzle from The Magic School Bus series.  We both agreed on this idea because 1) Monkey LOVES the Magic School Bus 2) the costume would be pretty simple to execute 3) the outfit wouldn't be so outlandish as to be a distraction in class and 4) we actually have a few of these books and have read them before she saw the shows  (it's the principle, after all).


     Most of Miss Frizzle's outfits are collared dresses with outlandish patterns, so I decided to start simple and add on.  I began with a simple navy blue, collared dress I found at Gymboree for $10.  (You can buy them online from Old Navy Kids for less, but I didn't have time to wait for shipping.)  I  found some fun solar system fabric at Hobby Lobby and a couple packs of yellow star buttons at Hancock Fabric.  

My haul
     I cut out individual planets from the fabric, pinned them in place, and sewed them to the dress


I swear I'm studying
Pinning it all in place 
I literally had to dust my poor sewing machine off before I could use it.
  Next I added the buttons by hand stitching them in place.  Here's the finished product:

Front

Back

      Something seemed to be missing, so I gave Monkey her own "Liz" to keep her company, by attaching her Beanie Baby "Rainbow" to her shoulder using safety pins.  I made sure to warn Monkey not to rip Rainbow/Liz off her shoulder or it would make big holes in the dress and/or the stuffed animal.  I also made sure to let her teacher know how I attached it so she could remove him if the stuffed animal became a problem in class.  It's a good thing I did, because when I got home from clinical, I found this note from Monkey's teacher.  It's a good thing Monkey was in the other room, because I got the giggles after reading it.


     Finally to round out the look, I twisted Monkey's hair the night before while it was still wet so that it would be good and frizzy curly the next morning.  J pulled it all up into a loose clip yesterday morning while I was at school with strict instructions to snap multiple pictures for me.  He, unfortunately, did not get the memo, so I don't have any pictures of the full ensemble. (You had one job, J!) Oh, well.  I may just snap a couple myself next time she decides to play dress up.

     Monkey and I had a lot of fun hunting for the perfect dress, finding the add-ons together, and even giggling while I did her hair.  It's really fun having a little girl, especially when she lets you in on the dress up game.  She got many compliments at school about her outfit, and she really enjoyed the extra attention.  Now she's telling me she wants to be Miss Frizzle for Halloween and Daddy can be Liz.  We shall see if he's up for that, but lucky for him she has plenty of time to change her mind!

     Also to celebrate Dr. Seuss' birthday, I made this special lunch for Monkey:


   I made the Cat in the Hat's hat by coloring red stripes on a white cheese stick.  Then I made green eggs and ham by dying an egg like you would an Easter egg, and threading a bit of rolled up ham on a toothpick.  I added in half of a banana, a GoGurt, and a bit of trail mix made up of Cheerios, cranberries, and yogurt-covered raisins.

     I had a lot of fun putting together all of this stuff so Monkey's usual Monday would be a tad more fun.  Now I'll leave you with these wonderful words of wisdom from Miss Frizzle herself :-)


Tuesday, November 4, 2014

Cookies and Cocoa

     Today I am enjoying my first official day off of school in about 3 months.  I just ended another trimester, so that makes 3 down, and 3 more to go.  Monday I start studying Labor and Delivery and Pediatrics, which are the two subjects I've been looking forward to since the beginning.  I'm not sure which field I want to go into, but I know it's going to be one of those two, and that excites me.  In the mean time, however, I've been catching up on a bit of housework.  Yesterday, Monkey brought home a 100 A on her big sight words test that covered all the words they've been learning since the beginning of the year, so we celebrated by turning some of her Halloween candy into yummy cookies.  So here's a recipe that is a classic:


M&M Cookies
1 cup packed brown sugar
1/2 cup white sugar
1 cup shortening
2 eggs
1 1/2 teaspoons vanilla extract
2 1/2 cups All-purpose flour
1 teaspoon baking soda
1 tsp salt
3/4 cups M&Ms, plus extra for topping

Preheat oven to 350.  Line baking sheets with parchment paper, or grease the baking sheets.

In a large bowl, or in the bowl of a KitchenAide mixer, blend both sugars, shortening, eggs, and vanilla until mixture is well blended and fluffy.  Add flour, baking soda, and salt.  Mix until well incorporated.  Add M&Ms, and gently stir.

Gently roll dough into small balls, and press onto the prepared baking sheets.  Add a few M&Ms to the tops of each pressed dough ball.

Bake at 350 9-11 minutes, or until edges are golden and middles are set.

     Now, what goes better with cookies on a chilly November evening than a nice warm mug of hot cocoa?


World's Best Hot Cocoa
1/3 cup unsweetened cocoa powder
3/4 cup white sugar
1 pinch salt
1/3 cup boiling water
3 1/2 cups milk
3/4 teaspoon vanilla extract
1/2 cup half-and-half

Combine cocoa, sugar, and salt in a medium saucepan.  Blend in the boiling water.  Bring the mixture to a boil, stirring continuously.  Once it begins to boil, simmer and stir for 2 minutes.  Don't let it burn.  Stir in milk and hear until hot throughout, but don't bring mixture to another boil.  Remove from heat and add vanilla.  Distribute evenly among 4 mugs.  Add 1/8 cup half-and-half to each mug.  Top with mini marshmallows if desired.  Enjoy!


Thursday, October 30, 2014

Well, That Didn't End Well

     Does anyone remember when Monkey and I made an ecosystem back in June?  That thing has been growing ever since!  We lost the fish after about a month, so we opened it up to remove them, and then allowed everything else to keep growing.  It was doing great!  We had tons of grass, and the algae and water plants were thriving.  The crickets died out one by one, and we never really could see the earthworms, but overall it was a good project.  I had it placed in the window above the staircase, and I kept thinking I should take it down and take it apart, but honestly I forgot about it.  That is, until J would complain about it being in the way of the blinds every night when he would try to lower them as it got dark.  You see, the window on the staircase is in a rather awkward position.  It's almost too high for us to open and lower the blinds, yet I'm a sucker for sunlight, so every morning I lean forward over the steps and stretch out on my tip-toes to reach the cord that will raise the blinds and let the sunlight in.  Then every night, J has the hard task of stretching out over the staircase to slowly bring the blinds back down.  Since adding the ecosystem to the mix, you also have to be careful not to let the cord get wrapped around the bottle or let the blinds down too quickly to avoid knocking the ecosystem off the windowsill.  Every night I would hear J complain about the darn blinds being open, and how stupid it was for the people to design the stairs the way they did.  So, the other night to be nice (and to avoid hearing the complaints) I decided to lower the blinds myself.  I grabbed the cord, and stretched out over the staircase to begin lowering the blinds, but I forgot something.  I forgot the ecosystem.  So, as I tugged the cord and looked down to check that my feet weren't going to slip off of the stair I was standing on, I felt something rather heavy smack the top of my head. Next thing I knew I was covered in nasty, smelly, fishy water, and there by my feet was the ecosystem, leaking it's foul-smelling contents all over our staircase.  Needless to say, I'm very glad I didn't leave the dead fish in there so that Monkey could learn about decomposition.  Regardless, I immediately jumped in the shower after scrubbing the stairs to wash the dead fish remnants away.

     Not all of my attempts at doing something nice for someone else has ended in utter failure.  I think these Halloween-themed lunches I've been packing for Monkey have come out rather well.

Monday: Spider Sandwich with Monster Apples

      This box contains a ham and cheese sandwich shaped to look like a spider.  I used a round cookie cutter to cut circles out of two slices of bread, a slice of ham, and a slice of cheese.  Next I sliced 4 long pieces of carrot super thin.  When I assembled the sandwich I laid the carrot sliced across that sandwich before placing the bread on top.  I used sliced olives for the eyes, and voila!


     The second half of this was the monster apples.  I quartered and apple, and I cut wedges out of two of the quarters, and I soaked these slices in a mixture of 1TBS lemon juice and 3/4 cup water for 5 minutes to keep them from browning before lunch time.  After they had soaked, I wiped them dry, and added almond slivers for the teeth.  For the eyes, I used candy eyeballs "glued" on with Nutella.  (You could use any type of nut butter, but Nutella is the only kind my daughter will eat).


 Tuesday: Celery Mummies

      For this lunch I made my own Garden Vegetable Cream Cheese (recipe to follow), but you can use the pre-made kind.  I spread a little on each celery stick.  Next I took a slice of ham and cut it into thin strips lengthwise and wrapped those around the celery sticks.  I used bits of black olives for the eyes.  I sent these to school with some grape tomatoes, pretzels, and an orange.

Wednesday: Spooky Sandwich


      I took the easy route Wednesday by simply making a ham sandwich and then cutting it into a ghost shape with my spooky little ghost cookie cutter.  I made a little face for him using my food markers.  Next, I added a bit of celery, and a few orange "pumpkins" for dessert.  These are simply peeled Halo oranges with a bit of celery wedged in the top to resemble stems.

Thursday: Mummy Hotdogs


      Now, I normally don't do hotdogs, but every once in a while, I figure it's okay to let my kid be a kid.  This box took a bit more prep work, because you have to make the mummies the night before.  I followed the instructions on the Pillsbury website to make the mummies, adding eyes using my food markers, and then I served them with a bit of ketchup, celery, and a couple "pumpkins".

Friday: Gravestones and Ghosts Bento Box


     This box included two mini sandwiches cut to resemble gravestones (the RIP on the left headstone is spelled out with little strips of ham).  Next I added two banana "ghosts" to the box to make it look like they were coming out of the graves.  I threw in some grape tomatoes, celery, and some of that garden vegetable cream cheese for dipping, and sent Monkey on her merry little way.


 Garden Vegetable Cream Cheese  
8 oz block cream cheese
1 medium carrot, minced
1 celery stalk, minced
1/4-1/2 onion, minced (start with less and add more to taste)
1-2 cloves garlic, grated
Salt and pepper to taste

Add all ingredients into a food processor, and blend until smooth.  Let sit in the refrigerator until flavors have melded.  Serve with crackers or veggies for dipping, or use as a spread.

Monday, October 27, 2014

Best Birthday Present Ever

      I'm not sure if I've mentioned this before, but I am a huge fan of The Bloggess!  She's hilarious, and awesome.  Not to mention about a year ago she wrote a book, and it was one of those rare books that had me laughing and crying.  Anyway, in the book she devoted one whole chapter to my favorite blog post of hers entitled "And that's why you should learn to pick your battles".  You should go check it out.  But a brief overview (seriously, go read the whole thing, this summary is a pale shadow of the awesome humor you'll be missing out on.  Still here?  Fine!)  so in the post she talks about how her husband sent her to the store with a warning to not come home with any more towels.  Well, she obeyed that particular order, and instead came home with a $100 giant metal chicken.  At least it wasn't towels.
     
     My big sister was the first to introduce me to The Bloggess, so when I bought the book I was quick to ensure that she was the first to borrow it (after I had read it, of course).  Next I spread the awesome around to my mom.  She loved it too.  In fact they both appreciated it so much that they hatched a brilliant scheme.  Not long after my birthday, I managed to escape to Louisiana for a day, my first trip home in a few months, and so my sister promised to have my belated birthday present waiting for me.  She had prefaced this gift with a few hints of, "I'm so excited to give you this", "Mom and I went in on something awesome", and "You're gonna love it".  I had no clue what to expect, so when I opened my mom's front door I was in utter shock.


     Around my chicken's neck was a sign that said, "Knock, Knock....." and a birthday card that introduced this chicken as being Beyonce's less expensive little sister, my very own Star-Spangled Solange.  The laughs alone were worth the price my mom and sister paid for this present, and I was excited to bring it home and put it in my garden.  The problem was, Solange wouldn't fit in my tiny Saturn Ion, so we had to leave her with my sister.   This Saturday we went to Louisiana again for my godson's birthday party, and we were finally able to bring Solange home in my husband's car.  It was a tight fit, and Monkey was given many warnings not to touch the tetanus chicken on the ride home, but we made it back without event.

     This morning J was sweet enough to give me a day off by waking up and bringing Monkey and her friend we carpool with to school.  I didn't get out of bed until around 8:00 this morning, and after I brushed my teeth and opened my door to go downstairs in search of food, I was greeted, yet again, by this familiar face:


     I was really worried that the chicken joke would wear off after a while, but after about five minutes of giggling this morning, I have to say it's still funny.  And I have to give J props for lugging Solange all the way up the stairs this morning.

     So there was point a to this post, other than showing you how awesome my family can be when it comes to carrying out an epic joke, but whatever the other reason was is gone now.  I'm actually just hiding out here in blog-world to avoid studying again.  I have my final exam in Gero/Psych Nursing Friday, and as usual, "I don't wanna!!!"  Instead, how about I show you some more of my Halloween decor?


     No, J is not part of the decor, but this awesome mummy is:

   
     I found these giant glow-in-the-dark eyes at the Dollar Tree, and I decided to use them to mummify our back door.  J and I used white crepe party streamers for the bandages and taped them to the door until is was mostly covered.  We only had to do the top portion of the door, because the screen door blocks the bottom part from view.  Not to mention we were getting tired of tape.  And streamers.  And each other.  ;-)

     This next decoration is a spin off of one of my favorite garden decorations.


     I took an old pallet and had J bust it up.  I used the various broken pieces to make the different signs by painting them all black.  For "Pet Sematary" and "'Salem's Lot" I used a copy of Stephen King's novels as a guide to get the handwriting the same.


     After designing the different signs, I screwed them to a post I had also painted black, and voila!


     The final bit of Halloween decor was something so simple, yet it may just be my favorite.  I made a spooky sort of set up by my front door with a vase, a skull, and a pumpkin.  The plan was to have my cauldron set out there filled with candy for trick-or-treaters, but I have something else in mind for that now.

     This vase is my favorite part of the set up.  It's just a bunch of sticks Monkey, J,  and I gathered after one of our family runs.  I painted the sticks black, and I put them in this old vase.  I added a bit of the cheesy "spooky cloth" you can buy at any dollar store at Halloween time to the inside of the vase, so you wouldn't see the ends of the sticks.  Next I propped a black raven from Michael's on one of the sticks.  Finally I used some leftover ribbon from my new wreath to finish it off with a pretty bow.

     I really like it.  Now all that's left is to set up my cauldron for trick-or-treaters and carve the pumpkins we got yesterday at our local pumpkin patch.  Have I mentioned how much I love this time of year?

Friday, October 3, 2014

It's That Time of Year

     I love October!  It's one of my favorite times of year.  The weather begins to get cool; the leaves are changing colors; the last little bit of summer is fading away.  The birds begin to fly south.  The night comes a little sooner, and the general mood seems a little more relaxed.  There's something about this time of year that still holds a bit of mystery, something that is rare in this day of the internet where connections are made and lost in the blink of an eye.  Even with the soaring rate of information that's within our grasp, there is something still slightly haunting yet alluring about this time of year.  I feel as if I'm awakening from the long dream of summer.  My spirit comes alive this time of year, and I relish the feeling.  Perhaps I'm being a bit mystical and eclectic at the moment, but what can I say?  It's that time of year.

     To celebrate the being of October, and in preparation for one of my all-time favorite holidays, I've been feeling a little crafty.  I decided to make a new decoration for my door, since my old wreath has begun to fall apart.  After finding one I loved on Pinterest, I decided to make it my way.


     I got these letters from Michael's, which is awesome because if you go to their website, you can usually print out a coupon.


I preceded to paint them black, orange, and I left one white.


    I used the lid of the paint as a template to trace circle on the letters for polka dots, and then I painted them the various coordinating colors.


     I sprayed them with Rustoleum enamel to keep them from getting moldy since they'll be hanging on the outside door.  I tied them together with orange polka-dot 3/4" ribbon.  I topped the B with a pretty orange bow, and voila!


     I love it, and it makes me smile every time I come home!  

Sunday, November 3, 2013

Halloween Leftovers

     You know what daylights savings time means to me?  It means I now wake up at 7 instead of 8.  I don't know where people get the idea that we gain another hour, because my internal clock is all, "Nope!  Get up, lazy bones, and be productive this morning."  Unfortunately, she didn't come with a snooze button. Yet somehow my husband manages to snore on next to me, and the sound of morning colors won't rouse Monkey for another 30 minutes.  I should be adding another 1667 words to my story for NaNoWriMo, but I don't wanna.  I made a mistake in my story yesterday, so I have to rewrite part of it, but I don't want to delete anything from my word count :-(  I'll tackle it after my run.  That'll give me time to rewrite it all in my head.

     It's November y'all; do you realize how crazy that is?  This year is almost gone.  I swear ever since I had Monkey time has been moving faster and faster, and this year feels like it's approaching warp speed.  Before I know it, it'll be next August, and Monkey will be starting Kindergarten.  Yikes!  I wouldn't mind skipping ahead to graduation, though.  Mine; not hers, of course.

     I'm rambling, aren't I?  You can thank J for that.  If he would wake up, I'd talk his ear off instead.  Oh well; I do have a recipe to share with y'all, though.  Because Monkey racked up on candy Halloween night, I've bee trying to find recipes to use some of it up.  This website, Something Swanky, has a list of 50 things you can do with leftover Halloween candy.  It's pretty awesome.  Last night I made these:


Brown Butter Milky Way Cookies

1/2 cup (1 stick) unsalted butter
1/4 cup sugar
3/4 cup dark brown sugar (can substitute light brown)
1 large egg
2 teaspoons vanilla
1 cup flour
1 cup + 2 TBS old-fashioned rolled oats
1/4 teaspoon salt
1/2 teaspoon baking powder
1 1/2 cups Milky Ways, chopped and frozen (I used regular and dark chocolate)

Melt butter in a small saucepan over medium heat.  Stir constantly, remove from heat immediately when butter starts to turn brown (about 8 minutes).   Pour into a shallow dish, and chill until it becomes solid, but still soft.  (I popped mine into the freezer for about 15 minutes).

In a large bowl, cream together butter and both sugars.  Add egg and vanilla; mix until combined.  Slowly mix in flour, salt and baking powder.  Stir in oats manually.  Wrap dough in plastic wrap and chill for 30 minutes.

Preheat oven to 375.  Line baking sheets with parchment paper or spray with cooking spray.  Roll dough into 1 1/5 TBS balls.  Press 4 pieces of frozen Milky Way into each ball. Bake 9-10 minutes, until brown on the edges, but still soft in the middle.  Cool for 3 minutes on baking sheet before transferring to a baking rack to cool completely.

Enjoy!

Tuesday, October 29, 2013

31 Crafts of Halloween

     Today I want to do something a little different.  Instead of a recipe for y'all I have a list of 31 Halloween crafts for your little one.  These are all simple to put together, but fun for your little one.  So here we go:

1. Make your own skeleton friend.  This one was simple.  Just go here and download the free template. Print it out; follow the instruction, and voila!  You have a tiny skeleton man for your child to play with.


2.  Cotton ball ghost.  This one couldn't be easier.  Simply outline the shape of a ghost on some black construction paper with glue, and have your little one place the cotton balls.  Add a couple of googly eyes, and there you go.


3.  Halloween tree!  Monkey has a year 'round tree, so we decorated it for Halloween.  You could do the same with a tree in your backyard.  For hers we used some orange crinkle paper, construction paper bats, and a witch's hat made from construction paper and a paper plate.


4.  Circle Pumpkin.  Here's another easy one; simply cut out nine strips of orange construction paper and one strip of green.  Have your little one form circles with them and tape them in place.  Arrange into the shape of a pumpkin, and you're done :-)


5.  Footprint ghost.  This one's self-explanatory.

6. ^Handprint tree.   Create a spooky tree with your little one's hand and black paint. Or for a less creepy look, use brown paint, and add leaves with their little fingerprints.


7.  Construction paper spiders.  Trace your child's hand on a black piece of construction paper.  Cut it out, and have them glue the two hands together as seen below.  Add googly eyes and a bit of string.


8.  ^Toilet paper bat.  Paint an empty toilet paper tube black.  Add red eyes and white fangs if desired.  Cut out wings from black construction paper and attach with tape.  

9.  Q-tip skeleton.  Have your little one assemble a skeleton out of q-tips, glue, and construction paper.


10.  Halloween color-by-letter; simply click on this link, and print out one of their Halloween-themed pictures.


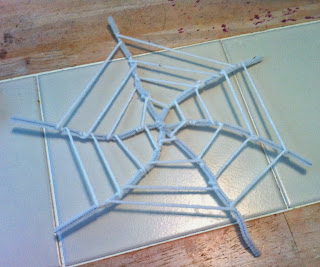
11.  Spider webs!

Simply twist three white pipe cleaners together.  Tie a bit of string to one of the pipe cleaners, and have your little one attach it to the next pipe cleaner by wrapping it around a few times before attaching it to the next pipe cleaner.  Continue until you're back to the knot.  Tie off the string.


  Go a little higher up, and tie a new know on the piper cleaner.  Have your little one continue to attach the string to each pipe cleaner by wrapping it around them as before.


 Repeat the process until you're almost to the end of the pipe cleaner.  Add a plastic spider to the center if desired and hang it up.


 12.  Construction paper pumpkins.  Cut out three strips of orange construction paper.  Tape the first together, forming a circle.  With the second strip, form another circle around the first; tape down.  Form another circle around the first two; tape down.  Cut a small square of brown paper; roll into a cylinder, and tape to the top of your pumpkin.  Cut out and attach a little green leaf.


13.  Witchy Shapes!  This one is great for reviewing shapes with your little one.

Using construction paper cut out the following shapes:
1 green square (for the face)
1 green triangle (for the nose)
2 small black circles (for the eyes)
1 black oval (for the hat brim)
1 big black triangle (for the body)
1 small black triangle (for the hat)
2 extra small black triangles (for the feet)
4 black rectangles (for the arms and legs)
8 orange rectangles (for the hair)
1 long brown rectangle (for the broom)
8 small brown rectangles (for the broom bristles)


14.  Connect the Dots Printable.


This website has a bunch of fun Halloween-themed connect the dots to choose from.


15.  Witch footprints!  Paint all but the heel of your child's foot black.  Paint the heel white; have him/her step on a piece of construction paper.  Accent with pipe cleaner hair and broom.  Add a witch's hat, and voila!

Sorry, this one's blurry.
16. Spinning ghosts!  This one is really simple, and it's cool to hang up and watch them spin around.  Simply trace out a sort of snail-shape on a piece of white construction paper or poster board, like so:


Cut out, and have your little one glue on or draw a face.


Then hang up and watch 'em spin.  

17.  Halloween Wreath.  Here's another one that's strictly construction paper.  Just cut out the different shapes for a pumpkin, Frankenstein, ghost, or other spooky creature, and have your little one assemble their wreath.  Monkey had fun making all the different ghost faces.


18. "B" is for bat!  This one's good for reviewing the letter "b" and for adding another spooky creature to your wall decor.


19.  Tired of construction paper?  Then here's a link to print out this Jack-o-lantern Scarecrow.


20.  Since we're still on a break from construction paper crafts, try this pasta skeleton:


We go through a serious amount of pasta in my house, so it was easy to find a variety for this particular craft.

21. Tissue Paper Ghosts


For one ghost you'll need one piece of cardboard cut into a circle, one clothespin, and one sheet of tissue paper, folded in half, and a piece of white string or yarn. Simply clip the clothespin on the piece of cardboard, wrap the piece of tissue paper around the "head" of the ghost, and tie with a bit of string around the "neck".  Monkey gave ours eyes before she'd let me hang them up.

22.  Apple Stamped Pumpkins


 For this all you're need is half of an apple.  Carve out a face, and have your little one use it as a stamp to make pumpkins.

23. Name Skeleton


 I've been seeing these floating around Pinterest for a while now, so we had to try one.  Simply write out your child's name in a bubbly cursive, and cut out.  Cut out a skeleton's head, arms, and legs.  Have your child assemble and draw on the face.  Monkey insisted that hers needed a bow, since it's a girl skeleton.

24.  Paper Jack-o-Lanterns.  Yes; we're back to construction paper, but these are a classic.  I remember making these in primary school.  Simply fold a piece of orange construction paper in half ("hamburger-style, not hot dog" as my teacher used to say), draw lines starting on the folded side going up until it's a couple of inches from the top, and have your little one cut along the lines.  


Unfold, a form a cylinder.  Tape ends together, and have you little one add a face before hanging up.


25.  Halloween Maze Printable


Click here to print out this fun maze, and help Frankenstein's monster find his head.

26.  Paper Ghost Chain.  


Take a piece of construction paper, and cut it in half lengthwise.  Tape those two pieces together so you have one really long strip.  accordion fold, and draw a ghost.
Cut out, and voila!


I have many fond memories of my mom making paper doll chains for my sister and I growing up.  I thought it was the coolest thing for her to cut out one doll, and then magically pull out this string of dolls.  I thought it would be fun to share the magic with my little Monkey.  However, she was not quite as impressed when I over-dramatically turned one ghost into many.  Her reaction? A quick twitch of her mouth upward before continuing with the coloring I had interrupted.  Fine kid!  She did enjoy giving them faces, though.  


27. Dress Up Yourself!  This one had Monkey a lot more excited.  I drew out a few sketches of various Halloween costumes.  


She colored them, and I cut them out. 


 We then used a few photos of us for her to "dress up" like paper dolls. 


 She got a kick out of making her Daddy a mummy, but my favorite was the grumpy witch.  It was quite fitting.


If you want to save time, or if you're not as proud of your horrible drawings as I am you could probably find some coloring sheets online and simply replace their face with your child's.

28.  "O" is for Owl! I've neer realized how much construction paper we go through in this house.


I'm not 100% sure owls are Halloween-related, but they're nocturnal.  And they start with "O".  October starts with "O", so there you have it folks, owls are Halloween-related.  Mainly because I'm only on number 28 and there's only a few more days until Halloween.  

29. Find the Differences Printable

Click here for a printout and let your little one find 7 differences in the picture.

30.  Witch's Broom

For this one you'll need an empty paper towel tube (or an empty wrapping paper tube for a life-sized model), brown or black paint, and brown construction paper cut into strips.  Have your little one paint the tube and tape or glue the strips to the bottom of the tube. Voila!

31. Paper Plate Skeleton

This crafts requires about 16 plates, white string and a black permanent marker.  Cut the paper plate into the various bone shapes; string the pieces together.  Add a face, and display your creation proudly :-)


Yay!  We made it to 31! Now get to work because there's only 3 days left 'til Halloween ;-)

Bonus:  Halloween Nails!  


Sorry guys, this one's just for those of y'all with little girls.  It was fun giving Monkey and myself a spooky manicure, until she started wiggling, that is.