Showing posts with label Sewing. Show all posts

Tuesday, January 28, 2014

Sneaux Day

     It's Tuesday afternoon, so by all rights I should be on my way to drop Monkey off before heading out to school, and I would be doing just that if it weren't for the fact that I live in the south and if it even looks like it might possibly freeze, sleet, or snow everything gets shut down.  Not that I'm complaining.  The drivers in south Mississippi are bad enough on a normal day, so I shudder to think how they'd handle driving around on something as foreign and as hazardous as an iced road.
   
     A day of no school also means extra time with Monkey.  Yesterday while everyone was at Wal-Mart stocking up on bottled water and canned food, Monkey and I were there gathering supplies for a few crafts to keep us busy.  Last night while she was sleeping I made Monkey a reversible superhero cape, using this tutorial I found on Pinterest.  It was super simple, and it only took me a couple of hours from start to finish.

Finally seeing her surprise.

She loved the personalized side!

"I'm Batman!"


You'll need:
Two types of fabric of your choosing, each measuring about 1 1/4 yards (I just got plain black cotton since I knew I wanted Batman, but I wasn't sure about the reversible side going into the project.)
Thread to match
Felt for your superhero symbol in appropriate colors (For free templets, click here)
Chalk

Fold one of your pieces of fabric in half, and draw a rough cape-shape.  It should look like this:


You can use a small plate or a bowl to make the neck nice and circular, and I cut mine all the way to the end of the fabric.  If your child is shorter, you can always hem it later.  Cut it out.  Fold your next piece of fabric in half, and use the one you just cut out as a template to make sure they are the same size.  Make your superhero emblems.  You can either free hand them like I did or you can go here for a tutorial and printables.  Sew one symbol on each half of the cape, making sure to line each up in the middle of the fabric.  Once the symbols are sewn in place, lay out one of the capes with the symbol facing up.  Lay the other one on top with the symbol facing down.  Pin them together, leaving the bottom unpinned, and then sew all along the edges, except for the bottom edge.  Turn the cape right side out, and hem along the bottom once you've tried it on your child to get the length right.  You can either tie the cape, or you can add velcro or buttons to it to fasten.  Because mine was a little big on Monkey, I left it to be tied.

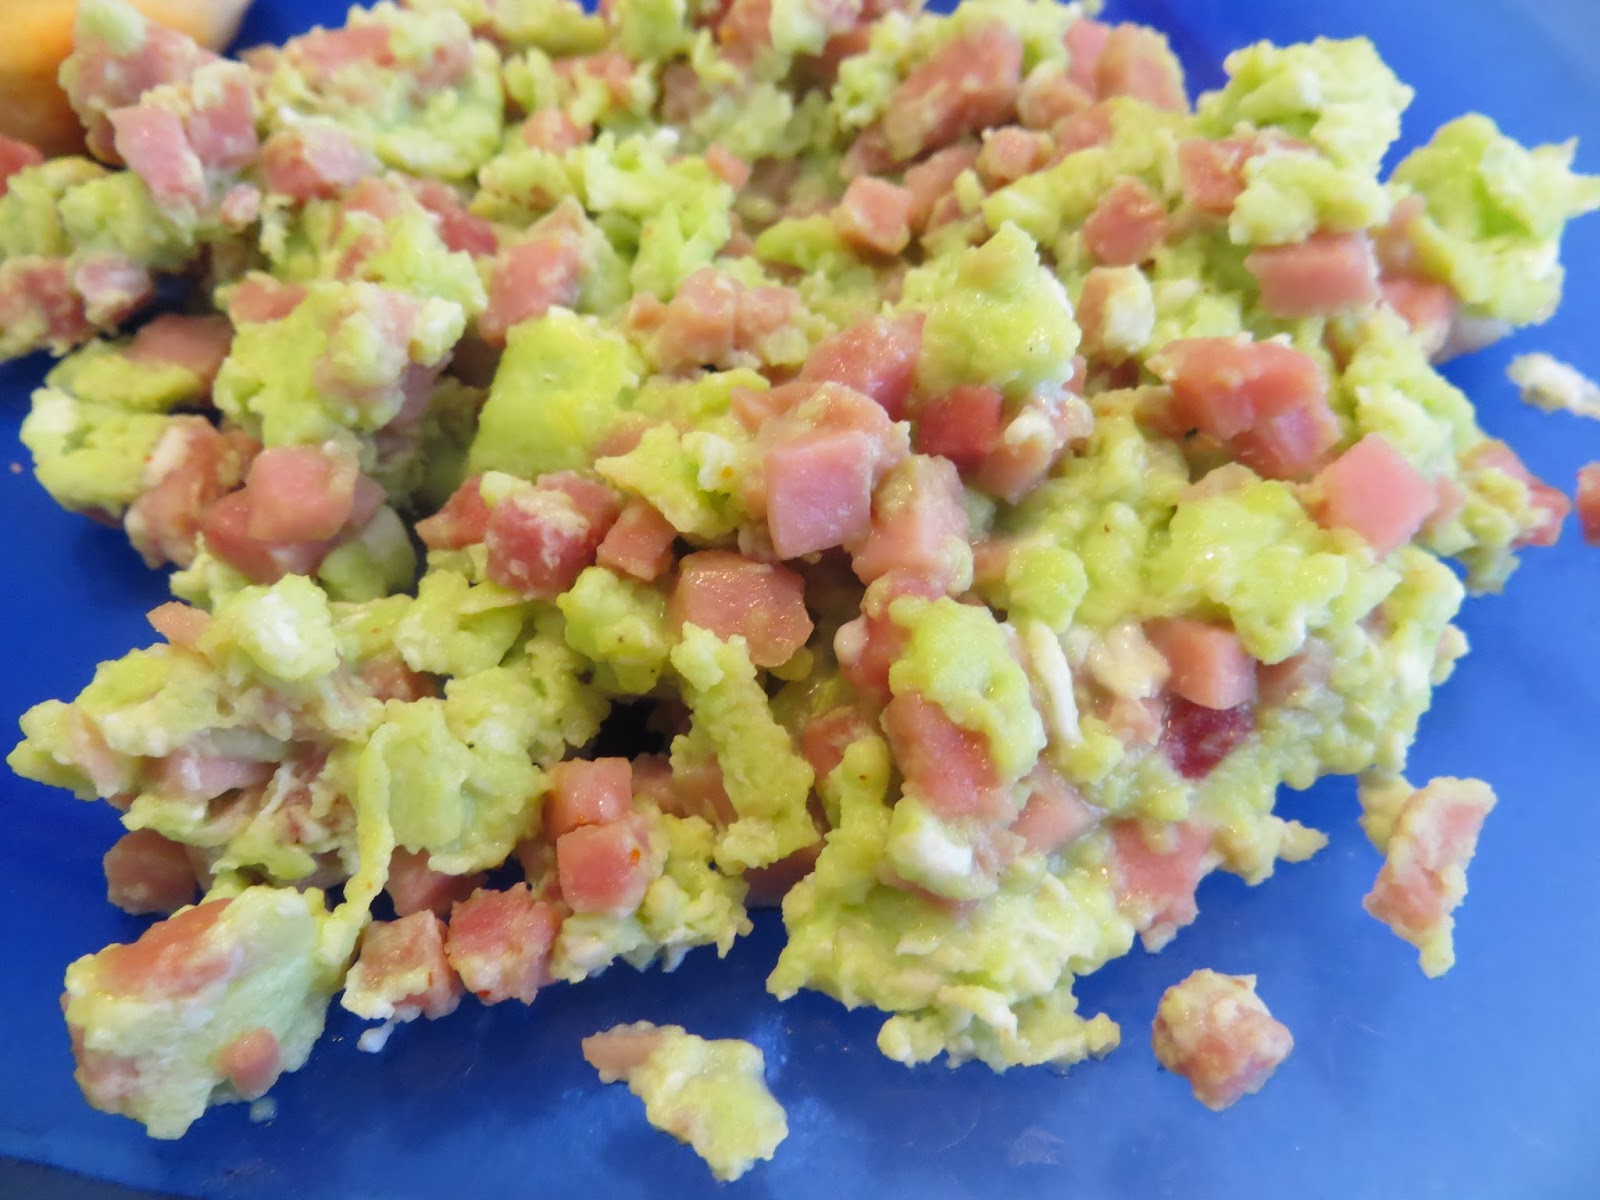
   She was so excited when she came downstairs to find it waiting for her.  She promptly put it on and dubbed herself "Super Bat Girl".  After that we made Green Eggs and Ham from her Paula Deen Cookbook she got for Christmas.  She loves that cookbook, and it has really simple and fun recipes for kids.
Even superheroes get hungry!

Paula Deen's Green Eggs and Ham
from Paula's My First Cookbook

3 eggs
1/4 cup minced ham
1 drop blue food coloring
Salt and Pepper to taste

   Have your little one crack the eggs into a medium sized bowl, and then let them whisk the eggs until well blended.  Add one drop of food coloring.  Add the salt and pepper as desired.  Have your little one stir the eggs again.  (Depending on their age you may have to take over here.)  Cook the minced ham over medium heat in a medium skillet for about 3 minutes.  Pour eggs mixture on top.  Scramble until cooked through.  This makes just enough for two people.


   After breakfast, Monkey planted Pink Cosmos and Forget-Me-Nots in her little greenhouse containers I found at Walmart for $1.00 a piece.  Freezing or not, I have a feeling the little seeds will be just fine in my warm house, sitting up my window that provides sunlight for more than 8 hours a day.  That's one good thing about the south, you can count on it getting warm again rather quickly no matter how cold it gets.


   Next we made bird feeders to put outside tomorrow after all the rain/sleet/snow has passed.  I remember making these as a kid myself.  You simply cover a pinecone in peanut butter and then roll it in bird seeds.  Add a string, and you can hang it from a tree near a window where you can watch for birds.  Monkey thought it was so cool that we were going to feed the birds.


I love the look on her face in this one, because she hates peanut butter.  She couldn't understand why the birds would eat the seeds if they had peanut butter on them.


Ta-Da!

    Now I better get off of here to make sure Monkey's really cleaning her room like she's supposed to.  I'm not holding my breath.  Before I go, let me share something I saw on Facebook that's rather fitting:

Winter in the South

Sunday, September 29, 2013

The Newest Avenger...Wolverine-a!

     Since J is off training in the field for the next two weeks, I'm getting a ton of crafting accomplished, and tonight I want to share something that I'm super excited about: Monkey's Halloween costume!

     As many of you know from Facebook, my little Monkey has been putting me through the ringer on deciding which costume to wear.  She originally said she wanted to be Wolverine, to which I responded with major glee, because I knew I could pull that off and make it cute.  Plus I was more than happy to oblige when she asked that her daddy dress up as Gambit while I went trick-or-treating as Rogue.  Then she crushed my hopes of a cat suit (totally joking here) and decided she wanted to be Hulk instead.  Next it was a witch.  Then a pumpkin.  Then Captain America, and so on, and so forth until I finally told her that she had until a certain date to tell me what she wanted to be.  The date came, and she chose her original request: Wolverine.  I was happy to oblige, and went out that day to buy the supplies so she couldn't change her mind again.  So here it is:

Ta-Da!

     As you can see, this is not the traditional Wolverine.  What can I say?  I have a little girl, and I was inspired by a post I saw a while back of Batman and Robin costumes complete with tutus.  I knew that was the direction I wanted to go for Wolverine-a.  So first things first, the tutu:


     I found a really good tutorial for tutus here.

You'll need:
Tulle---5 yards was just enough for my daughter, and she's a size 4T.  I found Peacock Blue Tulle at Walmart for $1.50 a yard.
Ribbon---You'll need enough to wrap around your waist plus a little extra to tie, so your waist size plus 8"
Scissors
Measuring tape
Sewing pins

Lay out your fabric on a cutting board or flat surface, it should be folded in half as it was on the bolt.  Measure 7" in from the outer edge of the tulle.  Place a pin at this measurement to mark it.  From that pinned point, measure another 7" in, and mark with another pin.  Continue to measure and mark along the entire length of fabric.  Cut the fabric into strips using the pins as a guide.  These strips will be about 7" wide.  Keep cutting until you have a nice little stack :-)

(At this point you may want to visit the original poster's website to see her step-by-step photos that go along with the following instructions; I took a few, but they're not as good.)

Next you lay out one of the tulle strips, and cinch it in the middle.


Fold the strip in half, forming a loop at the top.  Place your piece of ribbon on top of the tulle, loop side up.


Weave bottom ends of tulle through top loop, with ribbon caught in the middle.  Pull the ends of the tulle until a knot forms.


Repeat this process until you've covered your length of ribbon minus the extra for tying.


Tie a know next to the two end strips of tule to hold the strips in place. 

     Now that your tutu is complete you can move onto the shirt.  I bought Monkey a yellow shirt from Michael's in a size small.  I had to take it in a bit, but this isn't necessary if you can find a fitted tee for your child.  Here's what you'll need for the shirt:


One yellow shirt in your child's size
Yellow thread 
Sewing scissors
Blue felt with matching thread
Black felt
Black thread
Black fabric pen

First, hack off the sleeves.  I'm a bit OCD with sewing so I used my seam ripper to get it as neat as possible.  It really didn't make a difference.
No the shirt didn't turn orange;  I had to use my iPhone :-/
Hem the rough edges.  If you need to take in your shirt, I suggest doing it now before you go any further.  Next, I went ahead a drew in the abs and chest muscles on Monkey's shirt.


Then, I cut two equal-sized triangles out of the blue felt.  I "measured" these by having Monkey try on the shirt and the piece of felt across her shoulder.  I sort of eye-balled were the points should hit by referencing photos of Wolverine on Google.  It should look something like this:

"What are you looking at, bub?"
I pinned it in place while Monkey modeled for me, and then, using the blue thread, I sewed each side down.

As you can see, I neglected to hem my sleeves 'til the very end.  Don't make my mistake; it was a pain in the butt to hem them with that felt.

Now you can add the stripes that decorate Wolverine's sides.  I drew out a triangle on paper, cut it out, and "measured" with it to make sure I could fit three of them on each side.  


When I got the right sized template, I folded the felt in half, pinned the template in place, and cut out 6 separate triangles (which were actually diamonds when they came out because of the folding).  


Don't forget to fold the felt in half!
Next, I pinned the diamond-shaped felt onto the shirt so that there was a triangle-shaped stripe on both the front and the back before sewing in place using black thread.


Once you sew the black felt in place, you're all done with the top.  Now we can move on to Wolverine's mask.  Here's what you'll need:


Yellow felt
Black felt
Elastic
Black thread
Scissors

Again, I didn't have a template; I cut out a simple half-circle type shape in the yellow felt.  Using the images from Google again, I free handed the black portion of Wolverine's mask. until I came up with this:


Simply sew the top down with black thread.  I held the mask up to Monkey's face to gauge how far apart the eyes needed to be before cutting out the holes.  Next measure out you elastic by wrapping it halfway around your child's head to see when you need to cut it.  Sew each edge of elastic to each side of the mask, and you're all done here. 

     I snatched up the last pair of bright yellow leggings from Wal-Mart for $2.00 to go under her tutu, and that's all I have for y'all until I can figure out how to rig some claws and the boots.  Stay tuned to see what I come up with, and to see pictures of the entire outfit :-)

Update:  Here is the entire ensemble on Halloween:

"I've got your point right here, hub!"

Wolverina and Rogue
Wolverine and Gambit (aka Gumbo)
I finally caved and ordered the claws instead of making them.  You can find them here.

Friday, November 2, 2012

Catching Up

     Only one post last month?  Geez I have some catching up to do!  Most of y'all know that I've been keeping my nose to the grindstone, trying to stay ahead of the curve at school.  I came up for air today and realized we only have 5 weeks until finals, and one of those is Thanksgiving week.  I feel like this semester has flown by, and I'm not sure I'm ready for it to end.
     Besides school, I've been keeping busy with my biggest sewing project yet.  Drumroll, please....


     Monkey requested to be Rapunzel this year for Halloween, and I was all too happy to oblige when I found this awesome free tutorial for making the dress yourself!  In case you didn't see the link to the wig on my previous post, here it is.  This outfit was a total success, and I even found a paper Pascal to put on Monkey's shoulder.


     She nixed the wig after about 5 minutes, but people still got the gist.  She should have gone as Flynn Rider, as sneaky as she was being with the candy.  She'd go up to someone, say "Trick-or-treat", receive her candy, wait until they looked at the next kid, and then she'd reach into the bowl and help herself to a few more pieces.  It took me a few times of watching for it to click that she really was doing that.  Oh well, more KitKats for Mommy ;-)
   
      Speaking of treats for Mommy, I am so excited that the latest Cooking with Paula Deen issue had a recipe for Kettle Corn, and y'all know I have to share it, because it's perfect for this time of year.


Kettle Corn
1/3 cup canola oil
1/2 cup popcorn kernels
1/3 cup sugar
3/4 teaspoon salt

In a large Dutch oven, heat oil over medium heat.  Add a few kernels; cover until they pop.  Add sugar and remaining kernels, quickly stir and replace the lid.  Shake pan for 2-4 minutes or until popcorn is completely popped.  Transfer popcorn to a large bowl.  Remove unpopped kernels, and sprinkle with salt.  Enjoy :-)

Sunday, August 12, 2012

Feelin' Good


     I've been going back and forth on wether or not I'd post these, but I think it's time to share.  I know I mentioned a while back that I was beginning the couch to 5K program and the 30 Day Shred.  I finished the Shred a little over a week ago, and I wanted to share my results.  I didn't really change the way I ate.  I did, however, give up my only vice: sweet tea.  Instead I now drink water all day, except for the occasional coffee.  I was amazed at the results I got after adding 1 hour's worth of exercise to my routine three days a week and 30 minutes a day on the days I wasn't running.  So here we go:

Sorry for the dirty bathroom mirror.
     I'm embarrassed to say that this was me in the middle of June, modeling a bikini a friend of mine convinced me to buy because as she said, "There's always someone at the beach who looks worse."  Not exactly the motivation you want to hear, but it did motivate me in a way.  If my only consolation is looking for someone who is bigger than me, that's a problem, right?  Right!  I bought the bikini in May, and it stayed hidden in my closet until I pulled it out that night.  My husband and I had started Insanity (which I never finished), but something else was started that night too.  My determination to be better, to be healthier.  I wanted to be fit for the first time in my life.

Sorry for the blur.
     This is me from last weekend.  As you can see, I've still got some work to do, but the difference between who I was then and who I am now can't be captured with a picture.  I feel so much better.  I no longer avoid going upstairs, in fact, some days I run up and down them just to wake myself up.  I love running, even though I still get butterflies before setting out every other night.  All-in-all I'm happier, and I am finally proud of my body.  I'm not finished, but I can see how far I've come, and I'm not stopping here!

June 19, 2012
August 4, 2012
     Although Jillian Michaels got on my nerves long before the 30 Day Shred program was over, I can definitely give her props.  It worked for me.  No; I'm not "shredded", but well, you can see the benefits for yourself.  That video took a total of 30 minutes, and Monkey loved doing them with me, so it was easy to fit into our schedule.  

   Like I said, I'm not stopping here.  I'm on Week 4 of the Couch to 5K program, and I'm loving it.  The program is designed to help break you in gradually, and that's made all the difference for me.  Running is a head game for me (I blame the horrible Middle School coaches I had lol). This gradual process eliminates that.  The first night, I kept telling myself, "Keep going, you'll be able to walk in just a few more seconds."  Now I can tell myself, "You ran for 3 minutes straight and weren't sore, so you can handle 5 minutes."  It may not sound like much, but by the end of it I'm hoping to be able to say, "You've run one 5K already; you've got this!"

   I've also started the 7 Day Arm Challenge, so I'll let y'all know how that goes.  Now enough of this, I want to show off one more thing before I go.  I made a dress!  For me this time!!!

   I'm so excited!  I went to Wal-Mart yesterday and bought myself a men's 3XL shirt for $5 so I could try this tutorial out.  It was so much fun, and I love the dress I turned it into.  I wear a size L in dresses, so I used a 3XL Men's shirt.  I could've used a 2XL, but they were too short for my taste.  Once I got it home, I tried it on inside out and, following the tutorial,  marked where my shoulders started with some chalk.

Feelin' like I'm back in high school, wearing a borrowed t-shirt from my football-playin' boyfriend. Lol
    Then I drew a line from that mark to where the original armpit was and cut.  Then I put the sleeve back on my arm to measure where my armpit actually was, leaving a couple of inches for breathing room.

   
     I marked this with chalk and sewed.  Before I cut off the excess, I put the sleeve back on to make sure it wasn't too tight.  When I was sure it fit I cut the excess fabric.  Then I simply sewed the sleeve back on to the shirt/dress.

Now it fits better up top.
But the bottom's still big.
   Now I marked from the new armpit all the way down to the bottom of the dress, and sewed and cut away the extra fabric.  Then I measured the elastic to be about an inch shorter than my sleeve, cut two pieces of it, and sewed a piece to the top of each sleeve (while the sleeve was inside-out of course).  

Ta-Da
  This is where I strayed from the tutorial a bit.  You can sew a piece of elastic all the way around the dress where your waist is, but I found a belt that used to belong with the shirt I repurposed for Monkey, and I used that to cinch my waist instead.  I did go back and put some elastic on the front half of the dress, but that was just so that the belt wouldn't bunch up the dress in a weird way.  Here's the final result:


   Sorry for all the cheesy Facebook-style mirror pictures, but I haven't trained Monkey to use a camera yet. Haha.  I can see it in her future, though.  My camera went missing, and I found it in her toy box a few days later.  O.o

  Well that's all I have for y'all today.  I hope you're enjoying your Sunday!

Tuesday, July 31, 2012

Hi, my name's Aundraya....I'm addicted to sewing.

   I think I have a new addiction.  Look what I made today!

It's a pillowcase romper!

She's a pirate!
   I had a lot of fun making this one.  I found two tutorials that I followed. First, I used the steps for a regular pillowcase dress from this website.  I liked it, but then I found this one with the cute elastic around the pant legs, so I followed those instructions for the bottom half.  I think the end result was rather adorable.  To make it easy, though, I'll give you the full instructions of what I did.

What you'll need:

1 Standard size pillowcase, in the color/pattern of your choice
Elastic (I used 1/4" for the top and the bottom)
Ribbon (I used 3/8" Grossgrain)
Sewing Machine
Thread
Pins 
Iron

Begin by cutting off the part of the pillow that is sewn closed, making sure to keep your cut straight.  Next, fold your pillowcase in half lengthwise.  On the seam side, draw a rounded L-shape that is about 5" down and 1 1/2" from the seam.  If your ribbon and/or elastic is a bit bigger than what I used, just make sure you still give yourself enough room to make the casing over the elastic.  Cut out the L-shape.  Unfold your pillowcase; you should have a nice U-shape now.  Next, while staying on the ugly side of the pillowcase, fold the U-shape down 1/4", and iron it flat.  Pull the curved parts as best you can (you can even use starch, if necessary).  Then fold them over another 1/4", iron them flat, and pin them in place.  Sew that in place, and repeat on the other arm hole.

Next, fold the top over 1/4", and iron in place.  Then fold again 1" and iron and pin in place (if you are using wider ribbon/elastic, make your second fold 1 1/4").  Sew your casing.  For the length of your elastic, measure your model from armpit to armpit, and subtract two inches.  (Ie, Monkey's chest was 12" so I cut 2 pieces of elastic to be 10" each.)  Snake the elastic through the casing.  If you need to, use a safety pin.  Once your elastic is poking out the opposite side, sew your ribbon to the end (make sure if you have a design on your ribbon that it's facing the right side), and then sew the elastic to the inside of the casing. Repeat on the other side.

  Next I tried the dress on my little monkey, and had to cut it down to size a good bit.  I wanted her shorts to be just above the knees, so I made a mark and (after taking the dress off of her) cut straight up the middle.  Using the top of the cut as a point of reference, I made another U-shape which would later be the crotch and thigh area.  Then I measured Monkey's thigh and subtracted 1".  I cut two pieces of elastic to that size.  Next fold the bottom of the legs 1/4" (you should be looking at the ugly side btw), press with your iron, then fold again to 1/4", press, pin, and sew.  Leave the U-shape untouched for now.

Next, pin the elastic onto each side of the leg hole just above the sewn edge.  Find the middle of the leg hole and the middle of the elastic and pin that so that you keep the elastic evenly spaced.  Next sew, making sure to stretch the elastic as you go.  Repeat with the other leg hole.  Now, with the pretty sides together, fold the U-shape at the crotch in 1/4".  Cut notches in it so it will curve well. Then pin in place and sew.  That's it!

   I love how cute this outfit is, and I love that it's not another dress!  This means Monkey can play however she wants without showing her panties off to the world or getting a dress tangled around her legs.  

Update:  My sister pointed out that Monkey's picture looked a lot like another famous photo, so let me present to you Ryleigh the Riveter!