Thursday, August 9, 2012

Homemade Goldfish

   This morning I had the best waking-up experience in quite a while.  My morning routine is to check my phone, my Facebook and my Gmail account before I even put my glasses on.  It's been about two weeks since I've heard anything from my husband.  Apparently internet is not too dependable in his neck of the woods.  This morning, however, I was rewarded with not one, but two emails from him.  Inside were four videos he's been making over the past two weeks, just waiting for a day when he had enough time and signal to send them to us.  It really brought a smile to my lips.

   Apparently he hasn't forgotten our theme song, and he can't wait to get his ass back home, but until then, we're still truckin' along.  Yesterday Monkey and I had fun making some snack time goodies.  We tried out another Pinterest recipe, this one for Homemade Goldfish.  They turn out great, if not as pretty as the originals.


Here's what you'll need:

8 oz Sharp Cheddar Cheese, shredded (about 2 cups)
4 TBS butter, cubed
1 cup flour
3/4 tsp salt
2 TBS cold water

(Yeah; that's it!)

Combined cheese, butter, flour, and salt in a food processor.  Mix until it looks like course sand, like so:


Add water, 1 TBS at a time, pulsing after each addition.  Place dough on plastic wrap.  Wrap it up and let chill for 20 minutes in the refrigerator.


Remove from plastic wrap, roll out to about 1/4" thickness, and cut out various shapes.  I used a knife to make the fish shape.  You can also make your own cookie cutters from aluminum, or you can use icing tips or small cookie cutters.  I love that you can make virtually any shape you wish.  I'm thinking hearts for Valentine's Day, snowflakes for Christmas, etc.  Anyway, once you get your "fish" cut out, lay them on a cookie sheet lined with parchment paper.  Bake at 350 for 15 minutes or until crispy.  The amount of crackers your dough yields will depend on the size of the cutter you use.  The original poster said she got about 7 dozen out of hers.  I didn't count, but that sounds about right.

Our assorted shapes

 My favorite part about these Goldfish is the fact that they're cheesier than the originals, and you know exactly what goes into them.  Enjoy!

Tuesday, August 7, 2012

Dreamweaver, Lay Off Me!

   I'm starting school in less than two weeks, and I'm trying really hard not to think about it.  When I do, I find myself feeling like I did when I was five and about to start Kindergarden.  The night before class started, I remember laying awake all night with the biggest knot in my stomach, telling myself I needed to get some sleep while knowing that I wouldn't be able to.  That feeling of apprehension and excitement would revisit me every night before every "first day" from that point on.  Apparently it's not going to give up yet.  Last night I had a dream that I was at MGCCC for my first day of class, and I was happy to be there, but I wasn't alone.  For some reason, in my dream Monkey was with me, and before I could go to my class I had to take her to the potty and see her to her classroom.  Then I'd have to rush to my class on the opposite side of campus.  Then when that class let out, I had to rush back to Monkey's classroom, bring her to the potty again, before transferring her to a new class.  Then I'd jet off to my next class.  When that one was over, the whole process would begin again.  Needless to say, in my dream I was overwhelmed.  I felt like I wasn't doing either assignment properly because I was late for every class, and I was short-tempered with Monkey for not going quickly enough.  Thank goodness it was just a dream.

    I know this dream stemmed from a few apprehensions I've been having about juggling mommy-hood with school.  Add to that the fact that I'll be parenting alone this semester and you've got potential for disaster.  But the part that lured me in in the first place is the fact that therein also lies the potential for greatness.  I want this to be a struggle; I want this to be something I fight for.  I want my daughter to grow up knowing that just because it's hard doesn't mean you give up.  It means you just have to try harder.  I like a challenge; I always have.  That probably explains most of my life choices, and you know?  I wouldn't take any of those back for the world!

   That being said, there's still a week left before Monkey heads back to daycare, and we've been as crafty as ever.  Today I made paint, and she loved it!  It was thicker than most finger paints, so she loved squishing the goo between her fingers just as much as the actual painting part of it.

 
   In honor of Monkey's future dancing attempts, we even made this little ballerina's outfit:


  You can tell my child was born and raised near New Orleans.  When I asked what colors she wanted, she promptly replied, "Purple shirt, and green tutu, like Mardi Gras."

  Well, I need to take advantage of Monkey's quiet time and go get dinner started.  Hopefully my dreamweaver will paint me a prettier image tonight as I sleep, or at least one that doesn't give me a panic attack.

Saturday, August 4, 2012

Coping Method


    This life of mine is torn between cherishing each moment I have with my husband, and counting down the minutes until he’s home again.  I try to be strong when he’s away for my daughter’s sake and for my own.  After all, if I break down what good will that do anyone?  But I still have days when it gets to me, when it all becomes too much.  These days aren’t necessarily caused by my daughter being a handful, or even something gone wrong.  Some days I just miss my husband, my love, my best friend so much that I can’t hold it in anymore.  Thankfully these days are few, and I’m grateful that I’ve come to find my own coping method when I have a day like today.  
      I don’t know when my little ritual started, probably some time after he returned from his last deployment, but when we’re in bed after a long day, one thing I can count on is that he’ll fall asleep first. We sleep back to belly; he has to be facing the edge of the bed, to spring into action in case of emergency I guess.  While we were lying there, I’d press my right cheek as firmly as I could to the middle of his back, closer to his right shoulder blade than to his left.  Then I’d place my left hand on his chest and press as firmly as I could to draw him in.  Then I’d simply lay there, attempting to burn the memory of every portion of his skin, his smell, his breathing into my brain for future reference.  Some nights, I would be mistaken, and he wouldn’t be completely asleep.  He’d reach up and rest his hand over mine, pressing it into his heart.

     When he’s gone, I sleep with his pillow alongside my body.  On nights like tonight when the longing becomes too much, I pull that pillow close to me, and press my cheek against it, securing it on the other side with my left hand, and I again feel his skin pressed to my cheek.  I can all but hear his heartbeat beating calmly under my palm.  But then I realize that there will be no hand reaching up to encircle my own, and the almost tangible feel of him is gone.  I’m left in a cold bed, dazed momentarily before the tears set in.  This little ritual of mine hurts as much as it heals.  It’s a reminder that he’s gone, yes, but it also serves as an incentive to carry on.  It shows me that if I can conjure up an almost-real feel of him, then I can also conjure up the strength to make it through until I get to hold him again. 

Wednesday, August 1, 2012

Sisters

   My sister and I have always been toeing the line between polar opposites and kindred spirits.  She is a fiery, independent, quick-tempered, protective person with ambitions and goals that she fights for with all her might.  I'm a laid-back, go-with-the-flow type who keeps her mouth shut unless it's really important; a person who sets goals, but often exchanges them for something else.  My sister is an Aries; I'm a Cancer.  She's short; I'm tall.  She's a redhead (with all the characteristics that word brings to mind), and I'm a brunette (with most of the mediocrity that word drums up).  But when you scrape away a couple of the outer layers you find that we're not so different after all. We both have open minds with Christian morals.  We share a love of Jane Austen, sushi, and pickled okra that transcends your everyday liking.  We share a language, a form of expressing ourselves through the written word.  Most of all, we share a common past.

   Although we have younger siblings, my sister an I are the only ones that share that "growing up together" experience.  With our younger siblings, being so much younger than us, we were limited in the amount of time we actually spent at home together.  This doesn't mean we love either of them any less, it simply means my older sister and I share our childhood in a way that's just ours.  These days, with J being gone, and Monkey and I living in another state, I've grown to see how much my sister means to me.  Growing up we fought like cats and dogs (as is expected from two girls sharing one bathroom), but now that we're older, married and raising our children, I find myself able to relate to my sister in ways I never did.  We're almost on the same level.  We are at about the same place in life with our families, which makes it easier for us to talk and share and be open with one another.

   I was thinking today of how Monkey is an only child, and I can't help but hope that one day she has a sister of her own.  I can't imagine how lonely I'd be right now without my sister, or my brother, or my younger sister.  I think of Monkey getting older, and I imagine a time when her father and I won't be here any more, and it would be sad to leave this world knowing that she had no one to fully understand who she is or where she came from.  I know how close friends can get to being like sisters, but there's still something about having someone there who was with you, who grew up with you, who watched you fall and get back up, and who saw you become the person you are now that makes them close to you in a way that someone who doesn't know your story could never be.

   What prompted this deep reverie of pondering, you ask?  Pizza.  Simple as it sounds, my sister's blog post about pizza made me travel down this path of nostalgia.  Here's why:  This morning Monkey and I went to the Comissary to load up on our two weeks worth of groceries, and on the way home I was thinking about how excited I was to try a new pizza recipe I found so I could share it with y'all tonight.  When I got home from the store, I checked Facebook, and what do I see?  My sister had made a pizza and blogged about it!  It's just one of those quirky things, like when you buy the same shirt even though you weren't shopping together.  Or when you say the same thing at the same time.  Just that moment of connection.  That's what started it all, so blame the pizza for this bit of rambling you have to scroll through to actually get the recipe.

So here it is:


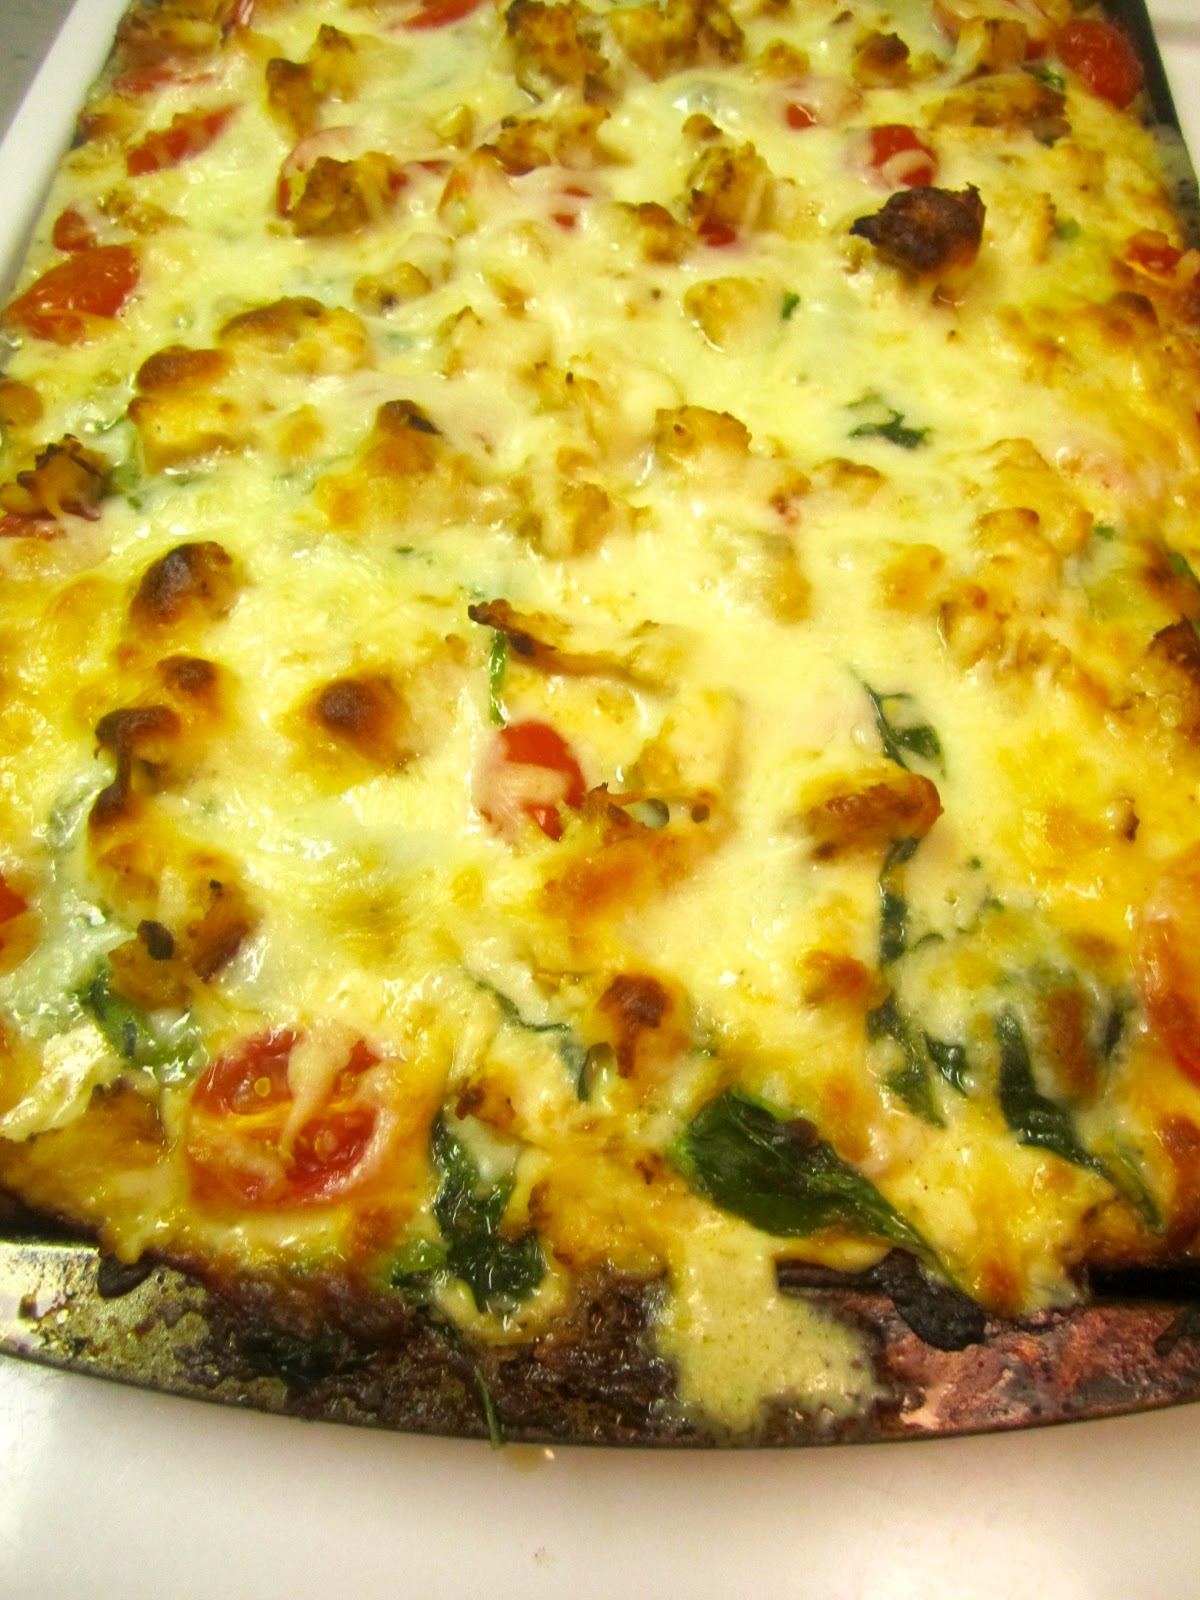
 Chicken Alfredo Pizza
Here's what you'll need:


3/4 lb chicken breast
Black pepper and salt to taste
2 TBS butter
4 cloves garlic, minced
1/2 tsp red pepper flakes
1 TBS all purpose flour
1 cup heavy cream
1/4 cup grated Parmesan cheese
16 oz pizza dough (I used Pillsbury's)
2 cups baby spinach, rinsed and dried
1 cup grape tomatoes, halved
1 cup mozzarella
2 TBS olive oil

Preheat oven to 375.  Place chicken in a Ziploc with half of the garlic, salt and pepper.  Let marinate for 15 minutes.  Heat oil in a skillet over medium-high heat, add chicken breasts and cook 4-5 minutes per side or until cooked through.


Remove from skillet, and cut into little chunks.  Set aside.  Melt butter in a saucepan over med-high heat.  Add remaining garlic and red pepper flakes, saute for a minute or two.


Add flour, cook slightly, but don't let it brown.  Add cream, and cook, stirring, until sauce is thickened.


 Remove sauce from heat, and stir in Parmesan cheese and salt and pepper to taste.  Line a 13" baking sheet (or pizza stone if you have one) with parchment paper, and then roll dough onto the sheet.  Spread the sauce over the dough.


Top with spinach,

Monkey loves helping me make pizza!
tomatoes,


 and chicken.


Add mozzarella.  Cook for 25 minutes or until dough is golden brown.


Enjoy!


Oh, and just for fun.  Here's a clip from one of my sister's and my favorite movies:

http://www.youtube.com/watch?v=GE589gkOYz0

Tuesday, July 31, 2012

Hi, my name's Aundraya....I'm addicted to sewing.

   I think I have a new addiction.  Look what I made today!

It's a pillowcase romper!

She's a pirate!
   I had a lot of fun making this one.  I found two tutorials that I followed. First, I used the steps for a regular pillowcase dress from this website.  I liked it, but then I found this one with the cute elastic around the pant legs, so I followed those instructions for the bottom half.  I think the end result was rather adorable.  To make it easy, though, I'll give you the full instructions of what I did.

What you'll need:

1 Standard size pillowcase, in the color/pattern of your choice
Elastic (I used 1/4" for the top and the bottom)
Ribbon (I used 3/8" Grossgrain)
Sewing Machine
Thread
Pins 
Iron

Begin by cutting off the part of the pillow that is sewn closed, making sure to keep your cut straight.  Next, fold your pillowcase in half lengthwise.  On the seam side, draw a rounded L-shape that is about 5" down and 1 1/2" from the seam.  If your ribbon and/or elastic is a bit bigger than what I used, just make sure you still give yourself enough room to make the casing over the elastic.  Cut out the L-shape.  Unfold your pillowcase; you should have a nice U-shape now.  Next, while staying on the ugly side of the pillowcase, fold the U-shape down 1/4", and iron it flat.  Pull the curved parts as best you can (you can even use starch, if necessary).  Then fold them over another 1/4", iron them flat, and pin them in place.  Sew that in place, and repeat on the other arm hole.

Next, fold the top over 1/4", and iron in place.  Then fold again 1" and iron and pin in place (if you are using wider ribbon/elastic, make your second fold 1 1/4").  Sew your casing.  For the length of your elastic, measure your model from armpit to armpit, and subtract two inches.  (Ie, Monkey's chest was 12" so I cut 2 pieces of elastic to be 10" each.)  Snake the elastic through the casing.  If you need to, use a safety pin.  Once your elastic is poking out the opposite side, sew your ribbon to the end (make sure if you have a design on your ribbon that it's facing the right side), and then sew the elastic to the inside of the casing. Repeat on the other side.

  Next I tried the dress on my little monkey, and had to cut it down to size a good bit.  I wanted her shorts to be just above the knees, so I made a mark and (after taking the dress off of her) cut straight up the middle.  Using the top of the cut as a point of reference, I made another U-shape which would later be the crotch and thigh area.  Then I measured Monkey's thigh and subtracted 1".  I cut two pieces of elastic to that size.  Next fold the bottom of the legs 1/4" (you should be looking at the ugly side btw), press with your iron, then fold again to 1/4", press, pin, and sew.  Leave the U-shape untouched for now.

Next, pin the elastic onto each side of the leg hole just above the sewn edge.  Find the middle of the leg hole and the middle of the elastic and pin that so that you keep the elastic evenly spaced.  Next sew, making sure to stretch the elastic as you go.  Repeat with the other leg hole.  Now, with the pretty sides together, fold the U-shape at the crotch in 1/4".  Cut notches in it so it will curve well. Then pin in place and sew.  That's it!

   I love how cute this outfit is, and I love that it's not another dress!  This means Monkey can play however she wants without showing her panties off to the world or getting a dress tangled around her legs.  

Update:  My sister pointed out that Monkey's picture looked a lot like another famous photo, so let me present to you Ryleigh the Riveter!


Monday, July 30, 2012

Repurposed

  Lately I've been reading the ReFashionista's blog.  I love how she manages to make something fabulous from something, well, not so fabulous.  She goes to the thrift store, picks up something funky, brings it home, and "repurposes" it.   I really like that word: repurposed.  I feel like I've been "repurposing" my life.  It started when I signed up for school, but it's grown from that.  I went from keeping the balance between mother and wife to being the only parent.  I'm trying to keep up with all my new goals, from working out to sewing, and school (the thing that started it all) will be beginning in a few short weeks.  With all this, I should be worn out, but I'm finally feeling great about me, about all my new purposes, and I'm loving my life.  I guess I've repurposed my life from one of hiding in fear to one that face fears daily, even the little ones.

   I'm proud to say that I'm finally tapping into those creative juices that I know are flowing around inside me.  Taking a leaf from the Refashionista's book blog, I decided to go through my closet and find something to repurpose.

Decisions, decisions
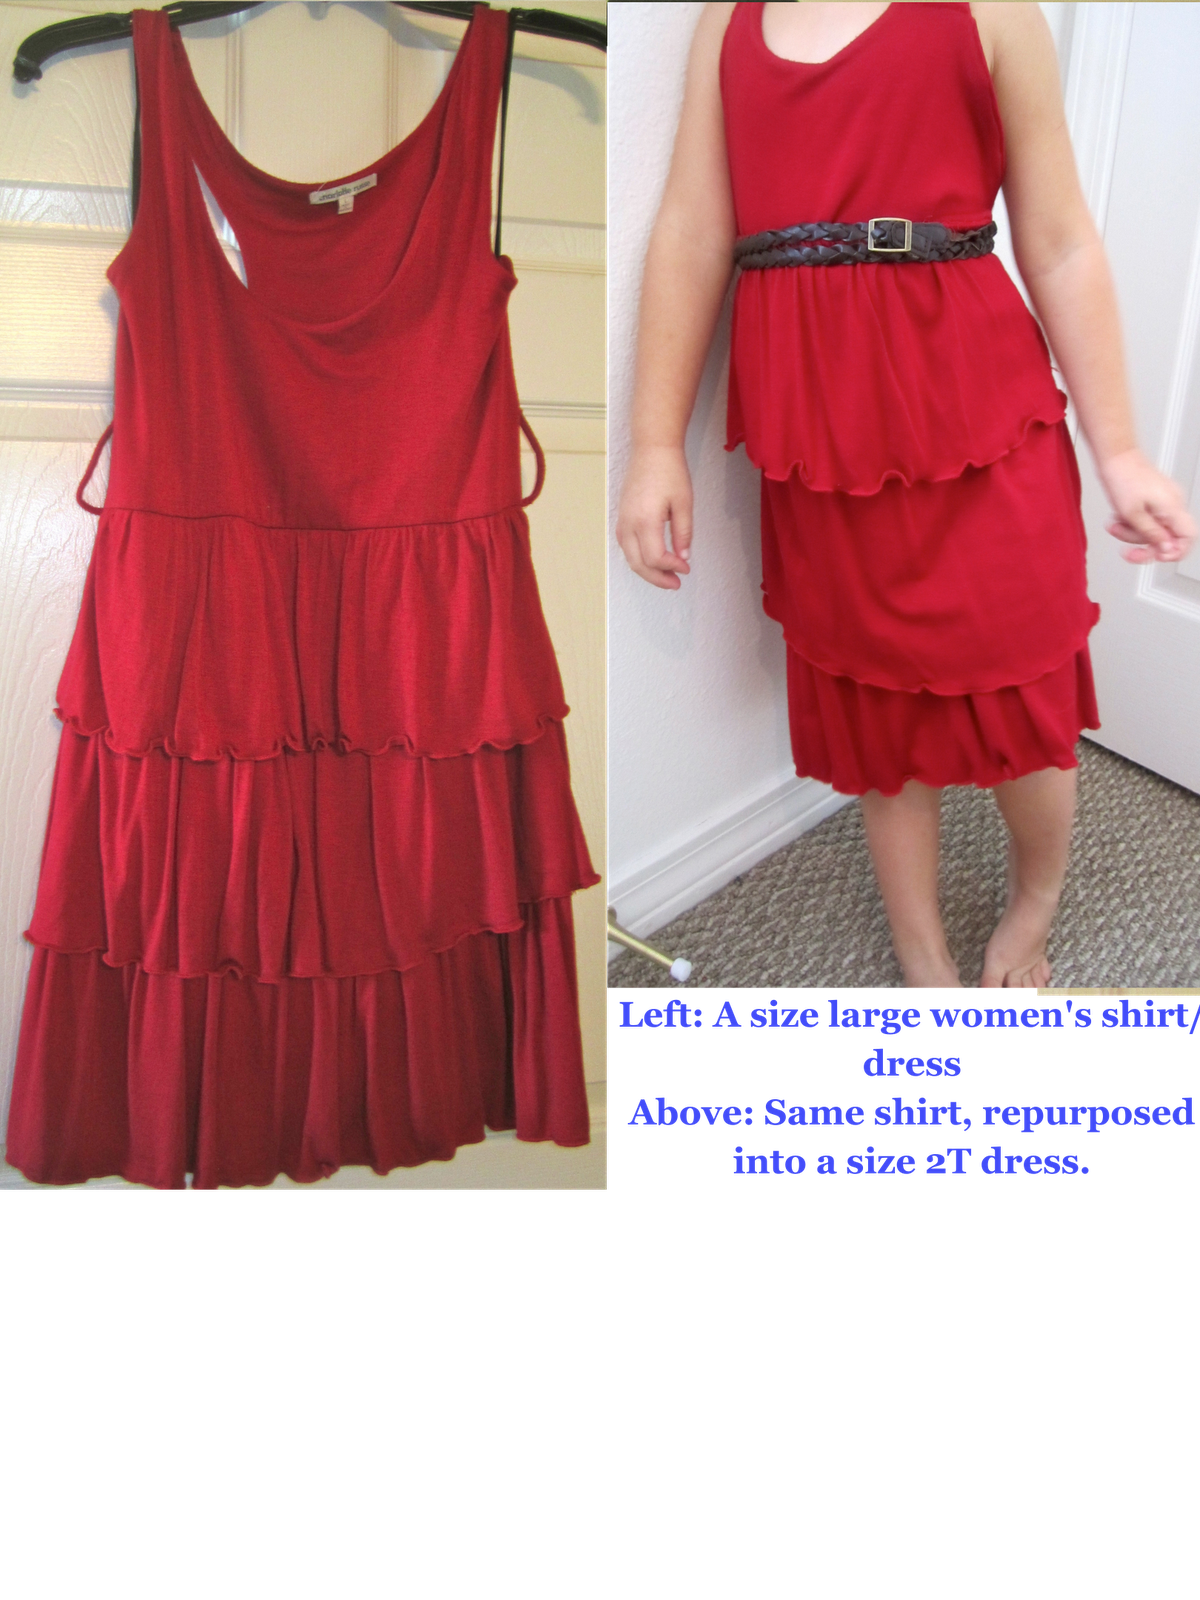
  I wound up going with this shirt/dress that I bought from Charlotte Rouse last summer for $5.  I've never worn it, although it's very cute.  It was too long for a shirt, but too short for me to be comfortable wearing it as a dress.

The Chosen One ;-)
   I wasn't quite sure what I wanted to do with it, so I just started ripping out stitches.


  It made for some very relaxing and peaceful work.  I was a little intimidated by the ruffle part, so I just cut those along the seam as best I could.


   At this point I knew I wanted to use the ruffles, and I was beginning to realize that this was going to be more or less a smaller version of the original.  I also stopped taking pictures because I had no clue how to go about all this, and I ended up throwing it all down in frustration before heading to bed.  This morning, however, I woke up refreshed and picked up where I left off.  And, this is the final result:


  I love this color on her!  She's so tan from this summer that it just looks perfect with her complexion.  And, of course, I have a Before & After picture:

        Monkey was such a big girl through all of this, being still so I could measure, trim and pin, and then being such a cute little model.  Now she's watching her favorite movie as I type this and get a few house chores accomplished.  Before I head off to do the latter, though, I wanted to share a couple games Monkey has been playing.  She's learning her number symbols, so these are a couple things to help her identify the symbol and recognize that it correlates to the amount.


  All you need for the first is a piece of paper, a marker or crayon and stickers.  Write the numbers on the paper, spaced out enough so that you have room for the stickers.  Monkey loves this one, and we hung it on the wall as a point of reference.  If she forgets what a number looks like, she can go count the corresponding stickers to figure it out.

Next up we did a game that requires an egg carton, a permanent marker and plenty of beads.  Write the numbers 1-12 into each of the egg slots.  Then let your little one place the correct amount of beads into each slot.

 
    Well the movie's coming to an end, and I still need to fold clothes, so I'll see y'all next time :-)

Saturday, July 28, 2012

She's Ready for her Close-up Mr. Demille

     I've pretty much decided that my child is going to be an actress, or a singer, or a dancer, or something that requires everyone to look at her.  She definitely knows how to command the attention of an entire room, for better or worse.  The other day, when my mom and little brother came to visit, we had to go into the Pass and ID place to get my mom's pass for the weekend to drive on base.  We were there for about an hour, waiting in line because everyone decided to go at the same time.  We passed the time pleasantly enough, talking, catching up, and of course, paying extra-special attention to Monkey's endless antics.  There was a good crowd, so it's no surprise that Monkey was in the middle of the room, where they could all see her.  She was dancing and jumping around until that got old.  That's when she started to sing.  Lately she's been making up her own love ballads, which are greatly influenced by all those Disney movies mommy lets her watch.  In the middle of everything, she belts out, "My heart is so full, and I love my Juju, and my Bubba is in my heart, and I will be so sad, because Mommy will be DEAD!!!"

   Yeah, she said that.  My mom (Juju) busted out laughing, and my little brother (Bubba) was torn between laughter and embarrassment.  I, meanwhile, was trying to recover the situation because all the old ladies who had been grinning and encouraging my little girl now looked at me with shock and indignation.  I just gave a weak smile and a shrug and said, "Gotta love those Disney movies".  That relaxed them a little, and I was able to convince my little brother to walk my little performing artist around the garden outside until we were finished.

    I'll be signing my little singer/songwriter up for dance in a few weeks.  Hopefully that will give her the limelight she seems to be craving, while also teaching her new skills and providing a new atmosphere to make friends.  I'm excited, and she is too.  She keeps asking me when we're going to dance class.  I may have created a monster.

    As for me, I've been up to my normal stuff of keeping busy.  I'm excited that July will be over in a few more days, that's one month down :-)

  I'm going to be sharing two recipes with y'all today, as soon as I figure out which ones I want to pick. How about a good ole Coffee Cake to start off with?

I love Coffee Cake for breakfast :-)

Hmmm....I can almost smell it.
 Coffee Cake Recipe

  • 1 cup butter or margarine
  • 1 1/2 cups granulated sugar
  • 8 ounces (1 cup) sour cream or Greek yogurt
  • 2 eggs, beaten
  • 1 teaspoon vanilla extract
  • 2 cups all-purpose flour
  • 1 teaspoon baking powder
  • 1/4 teaspoon salt
  • 1/2 teaspoon baking soda
  • 1 cup finely chopped walnuts or pecans
  • 2 teaspoons sugar
  • 2 tsp brown sugar
  • 1 tablespoon ground cinnamon
Preparation:
In a large mixing bowl, cream butter, sugar, and sour cream; add eggs and vanilla and beat well. Combine dry ingredients in a separate bowl then add to creamed mixture; beat well. Generously grease a 10-inch tube pan. Make topping by combining chopped nuts, sugar, and cinnamon. In bottom of the well-greased tube pan put about one-third of topping mixture; alternate layers of batter and topping, ending with batter. Bake at 350° for 45 minutes.

"C" is for Coffee Cake
  And now, how about a dinner recipe?  I'm thinking this Tuscan Pasta with Tomato-Basil Cream will be the perfect recipe to share.  I didn't realize that I had this pinned about 5 different times on my "Recipes to Try" board, but I did, so I figured it was high time I tried it, and I'm so glad I did!


Tuscan Pasta Recipe


  • (20-oz.) package refrigerated four-cheese ravioli (I used Buitoni)*
  • (16-oz.) jar sun-dried tomato Alfredo sauce (I used Classico)
  • 2 tablespoons white wine 
  • medium-size fresh tomatoes, chopped**
  • 1/2 cup chopped fresh basil
  • 1/3 cup grated Parmesan cheese
  • Garnish: fresh basil strips
  1. 1. Prepare pasta according to package directions.
  2. 2. Meanwhile, pour Alfredo sauce into a medium saucepan. Pour wine into sauce jar; cover tightly, and shake well. Stir wine mixture into saucepan. Stir in chopped tomatoes and 1/2 cup chopped basil, and cook over medium-low heat 5 minutes or until thoroughly heated. Toss with pasta, and top evenly with 1/3 cup grated Parmesan cheese. Garnish, if desired.
  3. *1 (13-oz.) package three-cheese tortellini may be substituted.
  4. **1 (14.5-oz.) can petite diced tomatoes, fully drained, may be substituted.

It didn't last long.
Well I need to go check on my rising star to make sure she's not getting into anything.  Yesterday I caught her wearing my pink high heels from last Homecoming with a purple scarf and a pink tutu while putting on my make up.  I wish I would've had my camera ready.