Showing posts with label Pinterest-inspired. Show all posts

Friday, October 3, 2014

It's That Time of Year

     I love October!  It's one of my favorite times of year.  The weather begins to get cool; the leaves are changing colors; the last little bit of summer is fading away.  The birds begin to fly south.  The night comes a little sooner, and the general mood seems a little more relaxed.  There's something about this time of year that still holds a bit of mystery, something that is rare in this day of the internet where connections are made and lost in the blink of an eye.  Even with the soaring rate of information that's within our grasp, there is something still slightly haunting yet alluring about this time of year.  I feel as if I'm awakening from the long dream of summer.  My spirit comes alive this time of year, and I relish the feeling.  Perhaps I'm being a bit mystical and eclectic at the moment, but what can I say?  It's that time of year.

     To celebrate the being of October, and in preparation for one of my all-time favorite holidays, I've been feeling a little crafty.  I decided to make a new decoration for my door, since my old wreath has begun to fall apart.  After finding one I loved on Pinterest, I decided to make it my way.


     I got these letters from Michael's, which is awesome because if you go to their website, you can usually print out a coupon.


I preceded to paint them black, orange, and I left one white.


    I used the lid of the paint as a template to trace circle on the letters for polka dots, and then I painted them the various coordinating colors.


     I sprayed them with Rustoleum enamel to keep them from getting moldy since they'll be hanging on the outside door.  I tied them together with orange polka-dot 3/4" ribbon.  I topped the B with a pretty orange bow, and voila!


     I love it, and it makes me smile every time I come home!  

Friday, March 14, 2014

Spring Break

     I'm currently mourning the loss of my Spring Break.  I go back to school on Monday, and I'll be taking my first test in Fundamentals.  I'm not thinking about that right now, though.  Instead I want to focus on all the fun crafts I've been catching up with over this break.  As most of you know through Facebook, I had a lot of fun putting together my front flowerbed.  It's very whimsy, and I feel like it's very me :-)


Of course, I included my flag I made from an old wood pallet a few years ago.  


     The "books" were probably my favorite part.  I bought a cheap wood border from Lowe's, and I painted it to represent a few of my favorite novels.  I was originally planning on using it to cover up that black water gauge thing in the bed, but I didn't like the way it looked there, so I put it in the background, like a shelf of books waiting to be dusted off and read. 


     The tipsy flowerpot is one that I've seen time and again on Pinterest, but I had to make it my own by using my favorite color: purple!  The sign is also a Pinterest find, but there were no instructions.  Basically I had my husband break up an old wood pallet with a sledge hammer, and I painted 6 of the broken pieces as you see above.  The I purchased a 6' post from Lowe's and cut is down to about 5' before painting it red.  Then I simply screwed all the pieces onto the post, and there you have it.  I thought it tied in nicely with the books in the background.

     Not all my planting were whimsical, however.  I also managed to build myself a couple of 4x4 raised garden beds for my vegetables.  Here's one of them:


   I think I may have finally found that green thumb that most of the women in my family have always had.  That's an exciting thought to me, although my husband doesn't think I should be allowed to go to Lowe's alone anymore after I came home with two trees in my little Saturn Ion.  Good thing for me that he's in Africa ;-)

    Playing in the dirt hasn't been my only pastime since I've been on break.  I've also been studying (blah!), working on Monkey's birthday crafts (She's going to be 5, y'all!), and catching up on reading!  I haven't read a really good series since Harry Potter, but for Christmas my Moma Deana gave me the Song of Fire and Ice series, and I loved it!  They have cause quite the internal struggle, though, what with my responsible side scolding me for not studying, and my impulsive side telling me to forget school for a while and immerse myself in the Seven Kingdoms.  I finally finished the fifth one, and now I feel like an addict who can't get her fix.  I can't wait until the next book comes out!

     Tonight Monkey handed me yet another fun project.  Her daycare is doing a St. Patty's Day party on Monday, and I signed her up to bring the drinks, so after picking her up from school today, we went by the commissary and bought a few of those Juicy Juice juice boxes.  We got the apple juice, since they were in a green container, but I wanted them to fit the theme a bit better.  As Monkey was working on a few crafts of her own design I started playing with her construction paper.  Next thing I knew I was transforming 24 juice boxes into 24 leprechauns.

Ta-Da!
     Aren't they cute?  I found a free leprechaun clipart here.  I downloaded it, printed it, and cut it out. Using a hot glue gun, I glued a bit of green construction paper onto the front of each juice box, and then I add the leprechaun's face.  Using permanent marker I added the collar, the buttons, the belt, and the legs.  I had a lot of fun with this, and Monkey is excited to bring these little guys to class on Monday. 

     
     Well I suppose I ought to get some sleep.  I have to tackle the commissary on a Saturday payday tomorrow.  I'll need all my strength for that!  Goodnight all :-)

Saturday, July 27, 2013

When I Get Bored, I Stop Being Bored and Get Awesome Instead

     Today I learned something about myself, and that is that I shouldn't be left to my own devices.  That goes double if I have access to internet and Pinterest.  Earlier while Monkey was watching a movie, I was perusing Pinterest, and I came across this:

     Of course I took advantage of the fact that Monkey was occupied and raced upstairs with yarn, scissors and tape in hand.  The plan was to surprise her and make if fun by asking her to rescue one of her "X-men" from her room.  (She's recently renamed all her toys to either Avengers or X-Men characters.)  Needless to say, I'm winning the Awesome Mom Award this year :-)


     I didn't stop there, though.  You see, last night J had the 0-400 watch (midnight to 4 am), so today he slept until about 1:00 pm.  That gave me plenty of time to have this waiting outside our bedroom door for him :-)

His initial, "WTH?" moment.

Shortly followed by, "Let's get down to business".

If you want to see J's trip through the lasers, here you go:
  

(Warning: I have an obnoxious laugh, and I provide the background music.)

     Not all of my day was spent being awesome yet unproductive; part of it was spent being awesome and productive.  :-)  I got to try out a new recipe from one of the cookbooks my Grandma sent to me a while back.  This one is called The Best of Country Cooking.  I have liked everything I've sampled from this book, but what I made today was too good not to share.

Ta-da!
 Cinnamon Raisin Bread
(Makes two loaves)
For the bread:
1 (1/4 oz) package active dry yeast (or 2 1/2 tsp)
1/4 cup warm water
2 cups warm milk
1/3 cup plus 1/2 cup sugar, divided
1/4 cup vegetable oil
2 tsp salt
5 3/4- 6 1/4 cups all-purpose flour
2 cups raisins
1 TBS cinnamon
1 TBS water

For the glaze:
1/2 cup powdered sugar
1 TBS milk

Dissolve yeast in warm water in a mixing bowl.  Add milk, 1/3 cup sugar, oil, salt, and 2 cups flour.  Beat until smooth.  Add raisins and enough remaining flour to form a soft dough.  Turn onto a floured surface; knead until smooth and elastic, about 6-8 minutes.  Place in a greased bowl, turning once to grease top.  Cover and let rise in a warm place until doubled, about 1 1/4 hours.

Punch down dough.  On a lightly floured surface, divide in half.  Roll each into 15"x7" rectangle.  Combine cinnamon and remaining sugar; sprinkle over dough.  Sprinkle with water.  Starting with a short side, roll up tightly, jelly-roll style.  Pinch seams and ends to seal.  Place seam side down in two greased 9"x5"x3" loaf pans.  Cover and let rise until doubled, about 1 hour.  Bake at 350 for 30-35 minutes or until golden brown.  Remove from pans to wire racks to cool completely.  Combine glaze ingredients; drizzle over loaves.


Enjoy! :-)

Tuesday, December 18, 2012

An Elf's Work is Never Done

     Well I've been as busy as a little elf today, running errands, picking up last minute gifts, and helping a few friends in need.  I even managed to make some super cute goodies for Monkey's teachers at daycare and the dance studio, and of course I have to share!

 
     Aren't these little sleighs the cutest?  I found the idea on Pinterest, of course, and they were so simple to make it took me maybe an hour to put them all together.

Here's what you'll need:


3 big bags of assorted mini Hershey's bars
3 dozen candy canes (any flavor you choose)
3 packs of 6 Kit-Kats
Hot glue gun
Ribbon

Simply assemble your "sleigh" using 10 mini bars, one Kit-Kat, and 2 candy canes.


Add a bit of hot glue to hold it all together, then wrap with some pretty ribbon or top with a cute bow, and...

Voila!
     Monkey's dance teachers thought they were precious, and we'll be handing out a few more tomorrow at daycare.  I got 18 sleighs out of my supplies, and now I have a few leftovers.  I have a super fun idea for the extras, but that can wait until tomorrow.  In the meantime, I was to share a recipe I tried last night that was so yummy!


Chicken Piccata
Makes four servings

2 boneless, skinless chicken breasts (cut in half lengthwise, to form 4 thin cutlets)
1 cup Italian style bread crumbs
1 egg, beaten
6 TBS butter
1/4 cup lemon juice
1 cup chicken stock
1/4 cup capers
1/4 cup fresh parsley, chopped  (I'm just now noticing I forgot the parsley; oh well!)
8 ounces angel hair pasta
2 TBS butter
1/2 cup grated Parmesan cheese


Pour the bread crumbs in a shallow dish. Pour the beaten egg in a seperate shallow dish. Take one chicken cutlet, and it dredge in the egg and then in the breadcrumbs. Shake off any excess breadcrumbs and place on a plate. Repeat with all cutlets.  In a large skillet, melt 2 tablespoons of butter over medium-high heat. Place two of the coated chicken cutlets into the skillet. Cook on each side, for 2-4 minutes each side. Once thoroughly cooked, place on a plate and tent with foil to keep warm.  Repeat with remaining butter and chicken, set aside.  Pour the lemon juice, chicken stock, and capers into the warm skillet. Stir and scrape up any of the loose brown bits. Bring to a boil. Reduce heat slightly and let sauce simmer for 5 minutes.  Meanwhile, cook angel hair pasta according to package directions. Drain water and add 2 Tablespoons butter to pasta and 1/2 cup freshly grated parmesan cheese.  Serve chicken with sauce and pasta. Garnish with fresh parsley and more grated Parmesan cheese, if desired. 


   Well I hope y'all enjoy.  I'm back on elf duty; I have to get those presents wrapped while Monkey is dreaming of sugarplum fairies and dragons.  Goodnight!

Friday, November 2, 2012

Catching Up

     Only one post last month?  Geez I have some catching up to do!  Most of y'all know that I've been keeping my nose to the grindstone, trying to stay ahead of the curve at school.  I came up for air today and realized we only have 5 weeks until finals, and one of those is Thanksgiving week.  I feel like this semester has flown by, and I'm not sure I'm ready for it to end.
     Besides school, I've been keeping busy with my biggest sewing project yet.  Drumroll, please....


     Monkey requested to be Rapunzel this year for Halloween, and I was all too happy to oblige when I found this awesome free tutorial for making the dress yourself!  In case you didn't see the link to the wig on my previous post, here it is.  This outfit was a total success, and I even found a paper Pascal to put on Monkey's shoulder.


     She nixed the wig after about 5 minutes, but people still got the gist.  She should have gone as Flynn Rider, as sneaky as she was being with the candy.  She'd go up to someone, say "Trick-or-treat", receive her candy, wait until they looked at the next kid, and then she'd reach into the bowl and help herself to a few more pieces.  It took me a few times of watching for it to click that she really was doing that.  Oh well, more KitKats for Mommy ;-)
   
      Speaking of treats for Mommy, I am so excited that the latest Cooking with Paula Deen issue had a recipe for Kettle Corn, and y'all know I have to share it, because it's perfect for this time of year.


Kettle Corn
1/3 cup canola oil
1/2 cup popcorn kernels
1/3 cup sugar
3/4 teaspoon salt

In a large Dutch oven, heat oil over medium heat.  Add a few kernels; cover until they pop.  Add sugar and remaining kernels, quickly stir and replace the lid.  Shake pan for 2-4 minutes or until popcorn is completely popped.  Transfer popcorn to a large bowl.  Remove unpopped kernels, and sprinkle with salt.  Enjoy :-)

Monday, September 10, 2012

Brain Break

     I'm feeling a good deal better about all these tests this week.  I took my first in Psychology today, and I have a good feeling about it.  Tomorrow I have an A&P Lab test.  Wednesday I have a Microbiology test, and Thursday I have an A&P Lecture test.  I feel ready, so I'm giving my poor brain a break in order to share this awesome thing I made!

"Rapunzel, Rapunzel, let down your hair!"
     Monkey finally decided on a costume for Halloween; she's going to be Rapunzel from Disney's Tangled.  I found an excellent tutorial for this wig on Pinterest.  The original poster was making her wig for a much older child, so she used more material.  If your child is smaller, like my Monkey, you'll only need to cut your yarn to about 100", and you'll probably end up loping off a good bit after you braid it.

     I've also been working on a few Christmas goodies, but you'll have to wait to see those.  I will share Monkey's Rapunzel dress, however, once it's finished.  As long as I don't completely ruin it and go buy one from the store, that is.

     I have one more thing to share before I go; here is a recipe for Spinach and Tortellini Soup.


4 cups chicken broth
1 cup water
9 oz package of tortellini
6 oz package baby spinach
Salt and Pepper to taste
Grated Parmesan (optional)

Bring broth and water to boil in a large sauce pan.  Reduce heat.  Add tortellini.  Simmer until pasta is tender.  Add spinach, and cook until wilted.  Season to taste.  Sprinkle Parmesan over the top.

     This soup was so quick and easy, and it tasted really good.  The best part is that it's only 250 calories.  Monkey approved :-)  Speaking of Monkey, she wants to go to the park, so I'll catch y'all later.

Monday, September 3, 2012

Bring It On!

     As most of you know through Facebook, I'm reaching the end of the Couch to 5K program (much to your relief if you're tired of my updates) which means I was starting to lose some of my focus.  I mean, the goal was to be able to run a 5K with my husband, but my husband is still months away from returning home.  So I was left wondering what my new goal would be to keep me occupied between now and then.  Coincidentally, my husband was the one who helped me come up with it during our Skype session this morning.

Me:  Would you be interested in doing a Valentine's Day run?  They have this annual one that looks like it'd be fun.

J:  Yeah!  That sounds awesome.

Me:  I figured you'd want to.  We can even register as a team and run together.  The top 5 couples to cross the finish line together win a prize pack.

J:  Sure, I guess.

Me:  Are you saying you don't want to run with me?

J:  No; it's just I don't think we'd win.  I'm faster than you.

Me:   Seriously?  When's the last time you ran?

J:  When I was home.

Me:  And when is the last time you saw me run?

J:  *obnoxious laughter*

Me:  Exactly.  I'd probably lap you by now.

J:  Not if I have two weeks to get back into it.

Me:  We'll see.

     See the new goal yet?  No; that's fine.  My new goal is to be able to beat my husband in a race and humble is cocky self just a little bit.  I may be setting myself up for failure considering the man did go through Navy SEAL training, but can you imagine the boasting rights if I do?  Totally worth it!  Plus I figure I'll have about 6 months worth of training on him ;-)  And I promise to have a scathingly brilliant blog about it when I win.


     Speaking of humbling, you know how I'm always trying out recipes I find on Pinterest.  Well here's one I tried a while back that tasted amazing, but...well... you'll see...

Nailed it!
Well...Sort of....
   This Braided Cinnamon Roll Wreath looked so tempting on Pinterest I had to try it (seriously, click the link to see how pretty this thing is supposed to be).  As you can see, however, I'm not quite as talented with the presentation part of cooking.  It still tasted fabulous, though, and J, Monkey and I devoured in it a matter of five minutes!  I'm not going to retype the recipe because I obviously need to go re-read the original instructions.  If you try it and get a better result let me know :-)


Update:  Apparently we will continue the theme of picking on my mom tonight, because tonight my mom, who works on computers all day, messaged me to say that she could not figure out how to leave me a comment on tonight's post.  What makes this scenario even funnier is that fact that she has left several comments in the past, but tonight it just wasn't happening.  She was kind enough to message me the comment, however, so I thought I'd share:

"Keep training and wear some really short shorts that he will have to look at when you are in front of him. You will so win. Hugs."

Yeah; that's my mom.  There's a reel from Will & Grace that keeps playing in my head.  Unfortunately, I can't find a video of it on Youtube, but basically Grace's mother was being her usual self and Grace looks at her and says, "Can I bring you to meet my shrink, because he thinks I'm making you up."

Saturday, July 14, 2012

Things You Just Don't Say

  So tonight Tessua and I were having one of our texting conversations, and it went a little something like this:

Me (talking about deployment):  "It's just one of those things that you don't really understand until you've been through one."

Tessua:  "Yeah, and then you get the people handing out advice..."

Me:  "I know!  Like when they say, 'Well it's not like you've never done this before.'"

Tessua:  "Agh! I feel like we need laminated cards to hand out...'Things No to Say to a Military Wife'.  We can count down from 10 or something.  Number one should be, 'Distance makes the heart grow fonder'."

Me:  "#2:  'At least he's not in Afghanistan'."

Tessus:  "Haha, unless of course, he is."

Me: "Let's not get technical. #3 should be 'I couldn't do that, that's crazy!'"

Tessua:  "Haha, I like that one.  I just say, 'Well I did, and I did it well.'"

Me:  "Nice, and #4 should be, 'Aren't you afraid he'll die?'  I'd like to just say, 'No, idiot, that never crossed my mind until just now'!"

Tessua:  "Yes!  People need to know better than to bring up death to a woman whose husband is deployed!  #NavyWifeIssues!  Idk if it exists, but it needs to!"

I vowed to google it, and apparently there already is a list (for the full list of things not to say, click here).  Sad times.  But!  There are no laminated cards yet, so I think we need to get to work on those!

  Not all my time has been spent griping about ignorance.  I've also been working on a few projects.  Of course, I'm going to share my favorite (so far) with y'all.  I was so proud of myself for finally making something that I had pinned on Pinterest that was neither food nor Monkey related.  They were these DIY coasters, and the turned out fabulously!

These are the ones I made for my sister.
  These were so easy to make, and they'd be perfect for stocking stuffers or a little something for a neighbor or the friend who has everything.  So here's what you'll need:


Plain white tiles from Home Depot (Mine were only $0.11 a piece)
Scrap-booking paper of your choice (or you can use photos, wrapping paper, etc.)
Mod Podge Gloss
Rustoleum Crystal Clear Enamel
3" foam brush
3/8" self adhesive felt pads

First, cut your paper (or photos) into 4x4" squares.

I love the 12x12" scrap-booking paper because you get 9 squares out of each sheet.

Ta-da!
Using your foam brush, add a layer of Modge Podge to your tiles.  Next, place paper in the center of the tiles, running your finger over the top to get any bubbles out.  Allow to dry for 15 minutes.  Add three coats of Modge Podge over the top of the paper, allowing at least 15 minutes between each coat.  Wait at least an hour after the last coat before spraying with the Rustoleum Crystal Clear Enamel Spray.  
In a well ventilated area (preferably outside) apply 2 or more light coats (within minutes of each other) of the enamel spray, spraying in a steady back and forth motion, slightly overlapping each coat.  Wait at least 30 minutes to fully dry.  Add the felt pads to each corner, and you're all finished!


These are the ones I made for myself.  
I loved the way they came out!
After seeing these, my mom requested a set.

  Well it's too late for me to do much else, so I'm going to hit the hay.  I hope everyone has a wonderful evening and a relaxing Sunday :-)

Thursday, June 14, 2012

If You Want Something Done Right, DIY

    As you all know by now, I'm in full stay-at-home-mommy mode.  This means more time for crafts, more time for DIY projects, more time for new recipes, well, just more time!  So lately I've actually been making things I've "pinned", and since I'm so proud of them, I'd like to share a few.

   Before I left my last position, I realized that I had access to all the wooden crates my little heart desired.  Unfortunately that wound up only amounting to about three before my last day, but I've been making use of them.  First, I made this to decorate our little garden:


   I just think it looks so cute, and it makes me smile every time I see it when we pull into our subdivision.  I got the idea from this awesome website that has all these great things you can do with a wood pallet.  It was easy too.  Once you get the pallet torn down into pieces (for an easy how-to visit this video), you simply lay out your seven pieces side-by-side and begin to paint.

Here's a fun fact, regardless of if the flag is to be displayed horizontally or vertically, the blue should be in the top left.

Red is supposed to begin and end the flag, but I think I can be forgiven for a DIY error.

Did you know that the 13 stripes represent the original 13 colonies? 
   That's enough flag trivia for one evening.  Now let's move on to another DIY project I've been working on.  This was pretty fun.  I did this at work, so I had a bunch of power tools at my disposal.  That was way more fun, and possibly more frightening to my co-workers, than I could have thought possible.  The result was pretty good too.


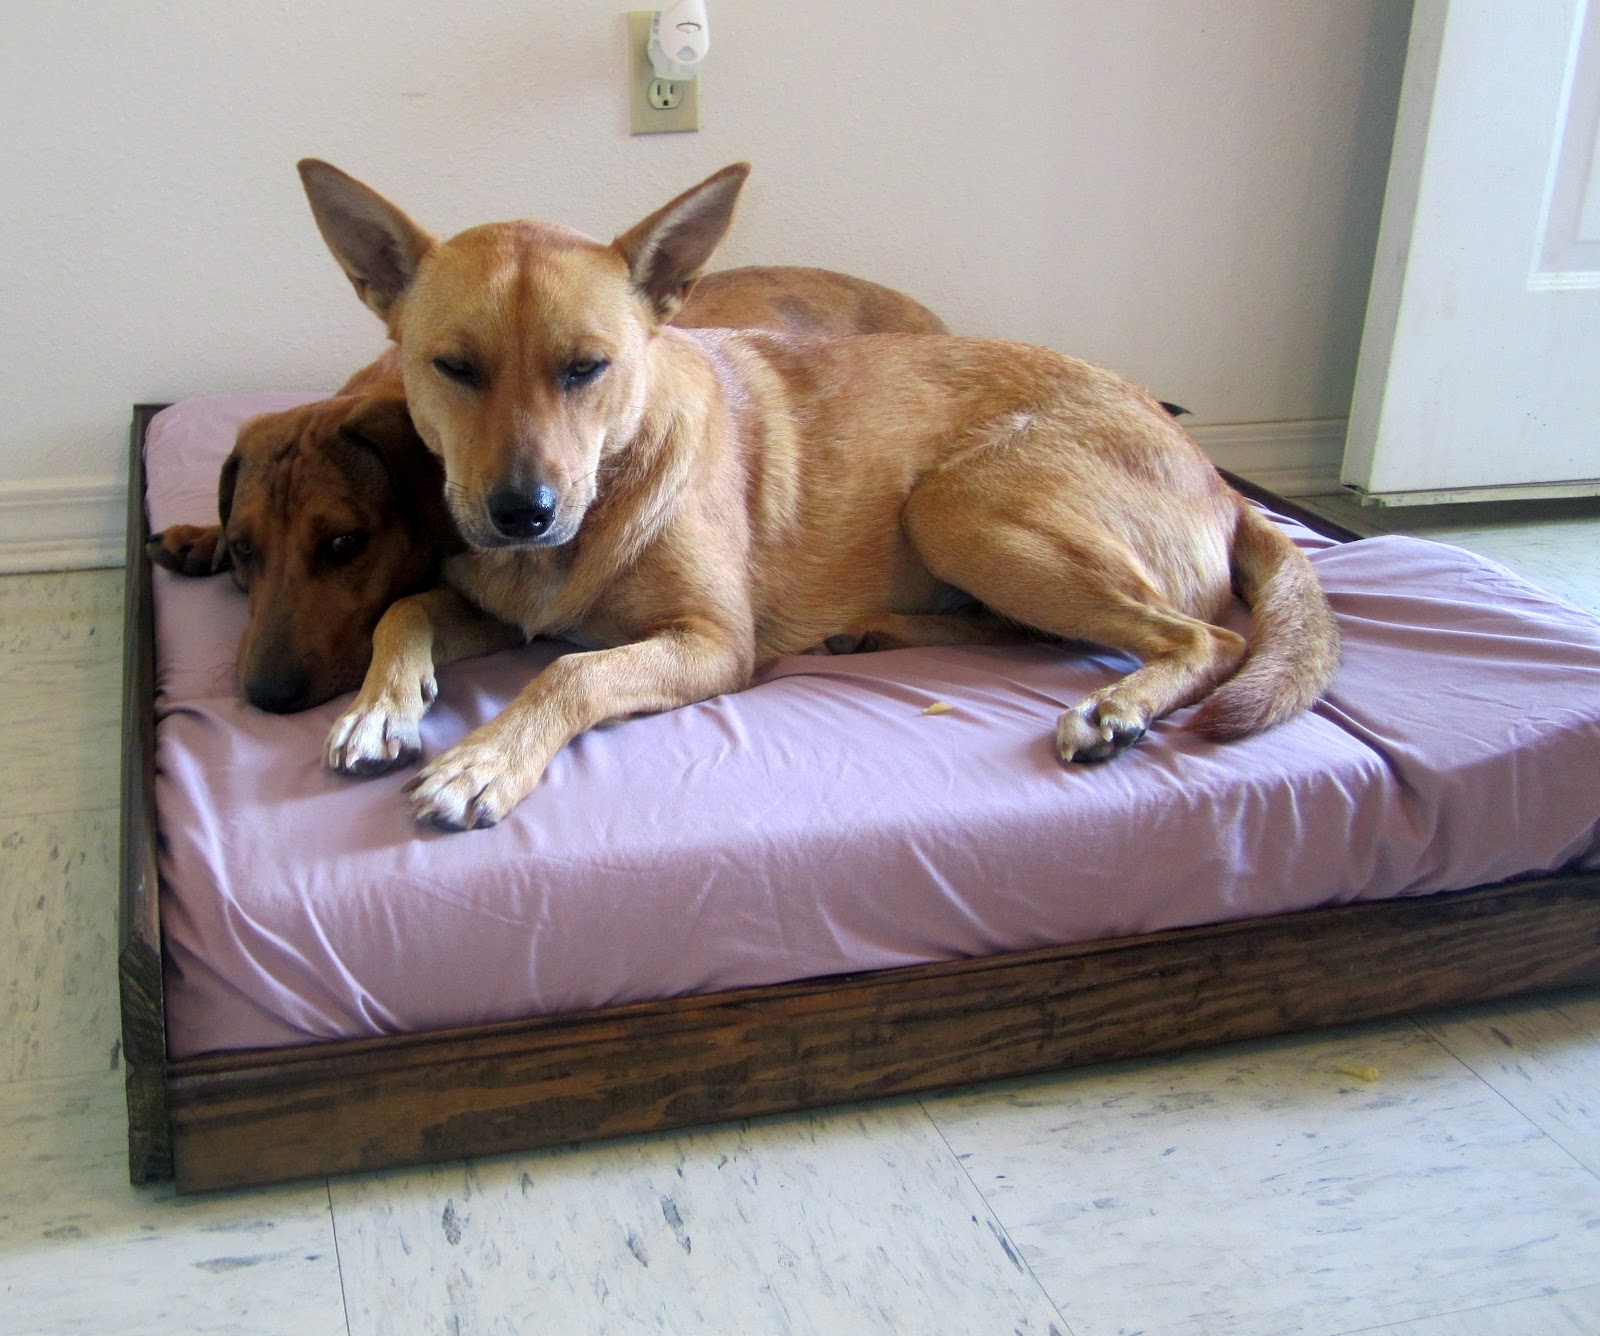
They love their new bed.
   I could have used a wood pallet for this project too, but on one of my last days at work, I discovered a beautiful piece of wood trim in the trash, and my boss told me I could have it if I wanted.  It was enough to make two dog beds.  One was about 3 1/2' x 3 1/2' and the other was 1 1/2' x 1 1/2'.  The bigger one, as you can see, is big enough for both my dogs.

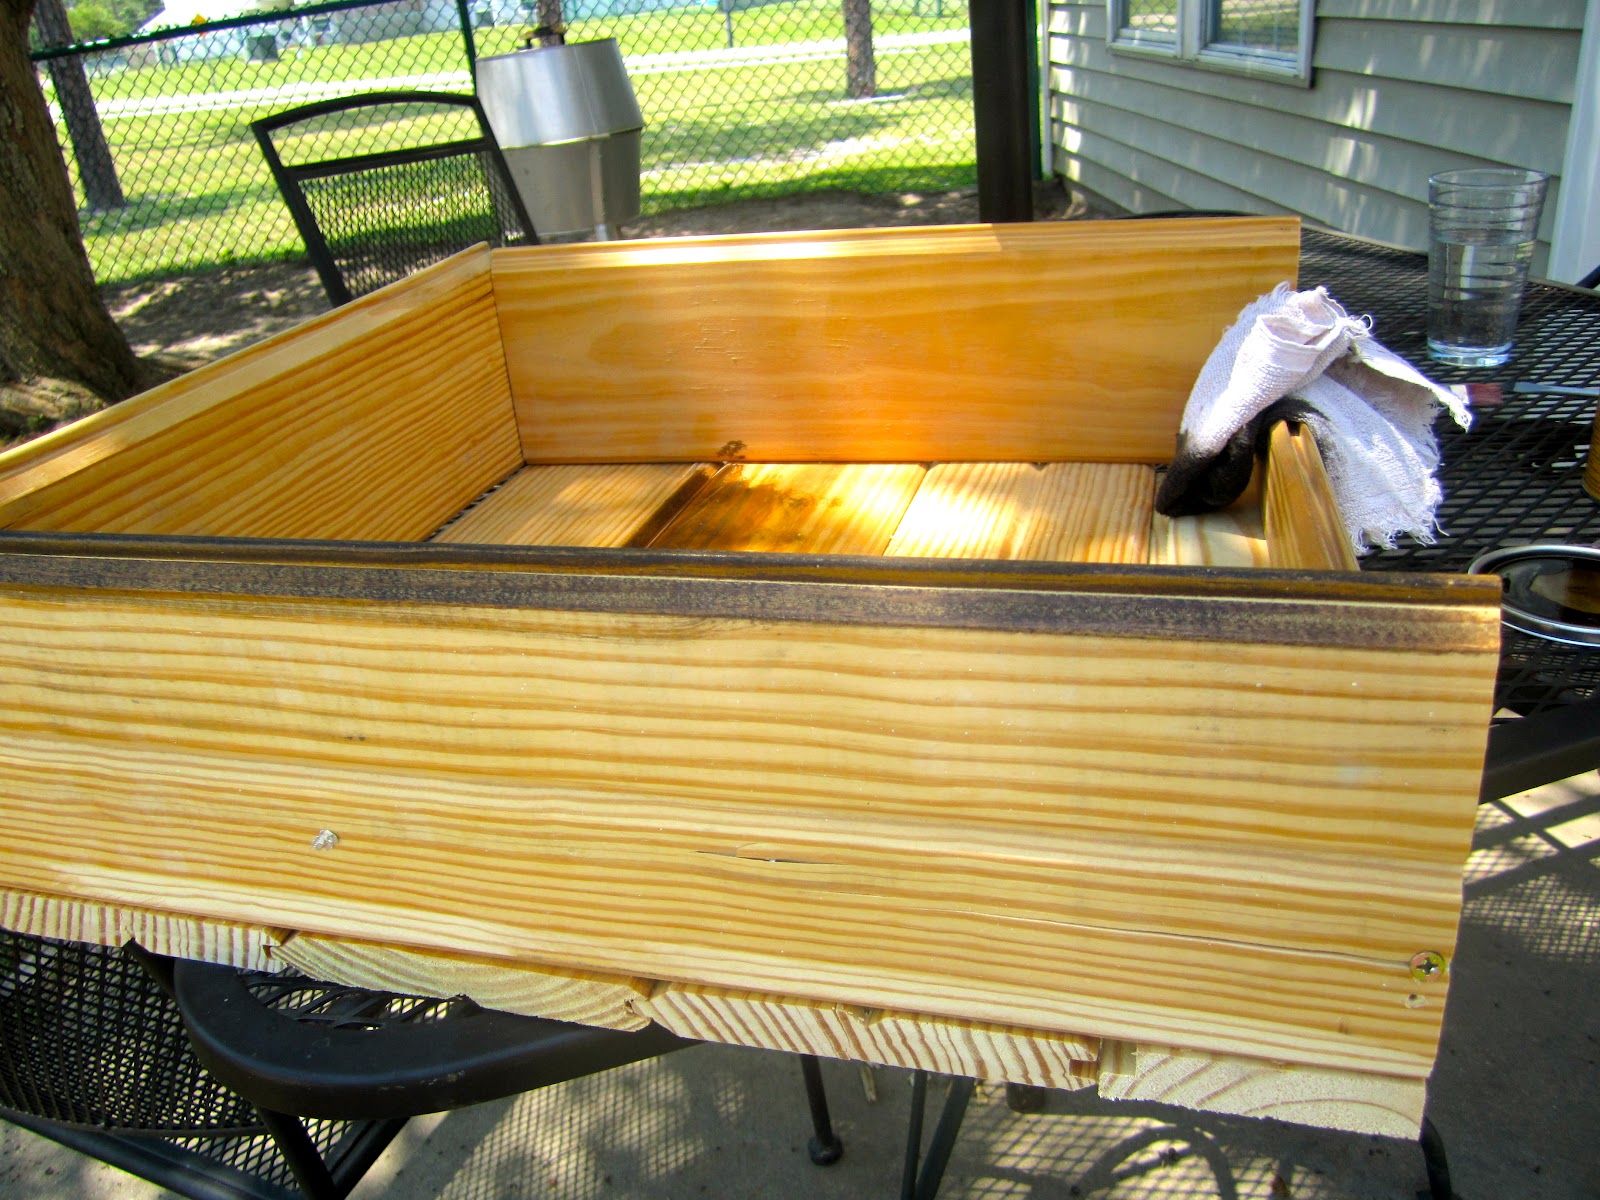
   I used seven 1 1/2' pieces for the small bed, one of which I cut in half lengthwise.  For the larger bed, I used 10 1/2  of the 3 1/2' pieces.  I put them all together like so:


Then I stained them a nice dark brown.


 We had gotten new living room furniture the week before, and I had the foresight to keep the cushions from the old couch, so that's what I used as padding for the bed.

The old cushions.

Remove the covers.

Cut down to size.

I found an old fitted sheet, and cut it to fit around the cushions, and...

Ta-Da!
Unfortunately, Andouille outgrew the small bed the day I finished it, so I gave it to my older sister for their small dog.  Now Andouille shares with Roux.

I'm using the term "shares" loosely.  He may be small, but he fights dirty.


Mine!


   You know when I came up with the title for this blog entry, I thought I could type up a cute, funny, but bitingly sarcastic story of how I asked J to do something, and he did, but failed, so I had to do it myself, but for the life of me, I couldn't think of a thing!  I know that's happened before, but I can't remember any specifics.  Perhaps this looming deployment has me going soft and mushy.  I can't even think of a single thing J did wrong today.  What's wrong with me?  

   Ah well, I guess I need to get off of here and go congratulate my loving husband on not being the center of my latest post.  Goodnight all!