Thursday, June 28, 2012

I Give Up!

  You know, I thought that with J leaving soon we'd be all sunshine and rainbows beforehand, but nope!  He wouldn't be my husband if he didn't insist on giving me at least one more ounce of grief before he departs.  I just thought I was being smart in my methods of avoiding conflict.  I was wrong.

   Today as I was looking through our pantry I realized that there are four more days until I get paid, but only one more recipe to cook.  I informed J of this who immediately decided to go to the store to buy steak for dinner.  Trying to be the frugal wife, I suggested something a bit cheaper that might go farther.  Also, knowing the fiascos that have been our grocery trips in the past, I decided I would sit this one out and let him handle it on his own.  I thought allowing him to find tonight's dinner would display a bit of faith as well as save myself a headache.  Again, I was wrong!

   After about 20 minutes, my husband pulls up and begins unloading his wares.  I think the best part of this whole scenario was the pride on his face as he displayed his purchases.  As if he were a hunter or forager bringing home good game to his wife.  Only his "game" consisted of ice cream, Go-Gurt, pepperoni, marshmallows, and a dog bone.  Completely oblivious to my utter astonishment, he kept lamenting over the fact that he had only gotten one bone for two dogs!

   So much for saving myself a headache, but I was more than willing to forgive him when I witnessed my baby girl helping him make Rice Krispie treats.


 That is until he broke my favorite spatula twice!  I quickly took over the Rice Krispie Treat-making before retreating in here to type all this up.


   I can't even make this stuff up!  My darling husband just stuck his head in here and asked me, "So, what do you want for dinner?"  He's lucky I didn't have anything to throw.

   I guess it's my fault, seeing as how this is one of those perfect "If you want something done right, do it yourself" examples I was trying to think of the other day.   So, in a way I asked for it.  Oh well, one more for the memory book, right?  I'm off to make pepperoni sandwiches for dinner.  But before I go I have to share a really good recipe.  It's what I'll be pretending to eat tonight ;-)


Chicken, Spinach and Mushroom Pasta Bake
from Paula Deen's latest issue

 1 (16 oz) box rotini pasta
2 TBS butter
1 (8 oz) package sliced fresh mushrooms
1/2 cup chopped onion
1/4 cup all-purpose flour
1 (32 oz) carton chicken broth
3 cups shredded mozzarella
2 (10 oz) packages frozen chopped spinach, thawed and squeezed dry
3 cups shredded rotisserie chicken (or leftovers from that delicious Herb Roasted Chicken recipe I shared)
1 TBS Dijon mustard
1 1/2 tsp salt
1/2 tsp black pepper
1/2 cup shredded Parmesan cheese

Cook pasta according to package directions, and keep warm.  Preheat oven to 350.  Spray a 13x9" baking dish with non-stick cooking spray.  In a large Dutch oven, melt butter over medium heat.  Add mushrooms and onion; cook, stirring frequently, for 5 minutes.  Add flour; cook, stirring constantly, for 2 minutes.  Stir in broth, and cook, stirring often, for 10 minutes or until mixture is thickened and bubbly.  Add mozzarella cheese, stirring until cheese melts.  Remove mixture from heat.  Stir in spinach, chicken, mustard, salt and pepper, and cooked pasta.  Spoon mixture into prepared dish.  Sprinkle with Parmesan cheese.  Bake for 25-30 minutes or until hot and bubbly.

Enjoy!

Tuesday, June 26, 2012

MyCAA: Helping Military Spouses Go Back to School

     I am super excited today!  I just got back from turning in the last of my Financial Aid.  I had already received a Pell Grant by filling out the FAFSA, but today I was approved to receive funds through MyCAA.  A friend of mine told me about this program, and I think it's only right that I share this information with other military spouses looking to go back to school.


First, what is MyCAA?

"MyCAA helps military spouses pursue licenses, certificates, certifications or Associate's Degrees (excluding Associate's Degrees in General Studies, Liberal Arts, and Interdisciplinary Studies that do not have a concentration) necessary for gainful employment in high demand, high growth Portable Career Fields and Occupations."

They offer counseling as well as financial aid for those going back to school.  


"MyCAA provides a maximum education benefit of $4,000 with an annual fiscal year cap of $2,000 to assist eligible military spouses who need professional credentials to meet their Portable Career goals."

This is perfect if you wish to pursue an Associate's Degree in a particular field.  

"Spouses of service members on active duty in pay grades E-1 to E-5, W-1 to W-2, and O-1 to O-2 who can start and complete their coursework while their military sponsor is on Title 10 military orders, including spouses married to members of the National Guard and Reserve Components in these same pay grades."

For these facts and more, visit the MyCAA Fact Sheet or visit Military One Source and click the MyCAA link to the right of the screen listed under "Popular Links".  It will warn you that you are leaving the Military One Source web page, simply click "Click Here to Go", and.....


...it will bring you to the MyCAA homepage.


You'll have to register, and once you're in you can set up your "Goals & Plans".  This part threw me off at first because you have to submit your requirements for your chosen career path.  I am getting an Associate's degree in nursing, but I'm not in Nursing school yet, as I need a few more prerequisites.  I went to my chosen college's website and pulled up the requirements for the Pre-Nursing program, saved them to my computer (or you could copy and paste if it's not already formatted as a zip file) then I uploaded it into my Goals and Plans.  This had to be approved.  Once that was done, I received a message telling me my plan had been approved and that I could now apply for FA (Financial Aid).

This is where you need to pay attention.  You cannot submit this too early or too late.  It has to be submitted no more than 60 days before the first day of term and no less than 15 days before the first day of term.  I had it marked on my calendar just to be on the safe side.  Also, you have to submit the course code, the course description and the cost of the course without lab fees or book fees. 

The school I'll be attending charges the same amount for all students considered full-time.  This means our bill is a lump sum, and not divided into courses.  I simply subtracted my lab fees and divided that number by the number of courses I'm taking.  That's how much each course cost, and I entered that number into the FA form.  It only took 3 days (and a weekend) for them to process my request and get back to me.  I received an email, and a message on MyCAA stating that my FA was approved.  All that was left was to sign it and turn it into the Financial Aid office at the college.

I hope that helped clear up a few questions.  Once you get into the MyCAA website, it's easy to navigate as long as you pay attention to those little rules.  It's a really good program, but not one that was very well advertised.  I had never heard of it until a friend mentioned it to me, and I would really like to spread the word that this program is available to many military spouses who think they can't afford to go back to school.  If you know someone in that situation, please help them out by letting them know they can go back to school.  They can better their educations, and they can do it for little to no out-of-pocket costs!


Wednesday, June 20, 2012

Onion-Sesame Flank Steak Lettuce Wraps

  Alright ladies and gentlemen, tonight all I have for you is a recipe.  That's right: no long-winded stories of shopping trips that end in disaster.  No bitter diatribe about J letting a dirty dog into my bed.  No anecdote about Monkey.  Just a recipe.  But with a recipe that's as good as this one, what else do ya need?

Here it is:
Onion-Sesame Flank Steak Lettuce Wraps
These were in Paula Deen's latest magazine issue, and I'm so glad I tried them!  They're hands-down my favorite of all her main-course recipes I've tried.  Here's what you'll need:

1/2 cup thinly sliced green onion
1 lime, zested and juiced
5 TBS low-sodium soy sauce
3 TBS brown sugar
2 TBS sesame oil
2 TBS rice wine vinegar (or rice vinegar)
2 tsp minced garlic
1 tsp crushed red pepper
1 (2 lbs) flank steak
1 head iceberg lettuce, separated into leaves
Optional Toppings:  matchstick carrots, bean sprouts, sliced water chestnuts, sliced green onion, fresh cilantro leaves, steamed white rice

In a medium bowl, stir together all the ingredients except the steak, lettuce and optional toppings.


Place steak in a resealable plastic bag.  Add half of the green onion mixture; seal bag, and chill for at least 4 hours or up to 24 hours.


Cover and chill remaining green onion mixture.  Spray grill rack with nonstick, non-flammable cooking spray.  Preheat grill to medium-high heat (350-400).  Remove steak from marinade, discarding marinade.    Grill steak for 8-10 minutes per side or until a thermometer registers 155 or until desired degree of doneness.

I have never mastered the grill; I hate the smokey flavor, and I hate waiting for J to do it for me.  So, I cooked my steak in about 2 TBS oil on the stove over medium-high heat for about 4 minutes per side, because I like my meat medium-rare.  
 

Once your steak is cooked allow it to rest on a cutting board for 10 minutes before cutting into it.  Slice across the grain.


Serve steak in lettuce leaves with desired toppings and remaining green onion mixture.  Like so:


I will say that the marinade is what made this meal.  Next time I grill steak I'm going to use that marinade again.  It was just enough "something different" without being overwhelming.  I loved it!


Saturday, June 16, 2012

Herb-Roasted Chicken

     I think I've mentioned before that my step-daddy did most of the cooking at my mom's house growing up.  He also travelled a lot for work.  That meant we had several night where mom was either whipping up something simple (like Kraft Mac-and-Cheese) or we were ordering take-out.  One thing that I remember as a staple in our house were those Lemon and Herb Rotisserie chickens you can get at Walmart.  Mom would take those home, whip up some mac and cheese as a side, and then use the leftovers to make the Chicken Salad I'm going to share in a minute.  Instead of buying a heat-lamp warmed hunk of meat, I decided to make my own Herb Roasted Chicken.

    For the past couple of weeks, I've been babysitting some herbs for a friend of mine while she and her husband were vacationing.  Before she left, she urged me to use as much of them as I wanted, so I wasted no time obliging her :-)   Below you'll see a few samples from her blooming little herb garden.


Chives, Oregano, Rosemary, and Basil (Purple and Green varieties)
  So here's what you'll need for the Herb-Roasted Chicken:

2-3 TBS fresh herbs of your choice
1 TBS salt
1 tsp pepper
2 TBS olive oil
Lemon, onion, and garlic to stuff inside your bird
5 lb whole chicken


Preheat your oven to 450. Remove gizzards and neck from your chicken.  Stuff bird with lemon, onion, and garlic. Set aside, and chop up your herbs.  Mix chopped herbs, salt, pepper and olive oil in a small bowl.  Rub herb mixture all over bird. (You can rub a bit of lemon juice over it too, if you'd like.)  Place in a roasting pan, and bake for and hour or an hour and fifteen minutes.  Remove chicken from the oven, but DO NOT cut into it yet.  Let it rest for about 15 minutes, so that the juices can redistribute.

 Serve with your choice of sides and enjoy!


I love having the leftovers to make my Mom's Chicken Salad.


Here's what you need:

4 cups chicken (chopped)
1 cup chopped celery
1/2 cup chopped parsley
2 TBS lemon juice
1 cup mayo
small onion, diced
1 cup walnuts
apple, diced
Tony's to taste
2 TBS green onion (optional)

Mix all ingredients in a large bowl, and serve on croissants, Bunny bread, Rye, Wheat, Wheat Thins, Triscuits or whatever.  This stuff is good on anything :-)

If you'd like, you can substitute halved seedless grapes for apples, and toasted, sliced almonds for walnuts.  You can also play around with the amount of mayo if you like it drier.


Ta-Da!
Also, you can use the carcass from the Herb Roasted Chicken in my favorite Chicken Noodle Soup recipe.  It adds a few new flavors, and is really good.

  Well, I hope y'all are all enjoying this beautiful Saturday.  I'm about to get off of here and go feed my family.

Thursday, June 14, 2012

If You Want Something Done Right, DIY

    As you all know by now, I'm in full stay-at-home-mommy mode.  This means more time for crafts, more time for DIY projects, more time for new recipes, well, just more time!  So lately I've actually been making things I've "pinned", and since I'm so proud of them, I'd like to share a few.

   Before I left my last position, I realized that I had access to all the wooden crates my little heart desired.  Unfortunately that wound up only amounting to about three before my last day, but I've been making use of them.  First, I made this to decorate our little garden:


   I just think it looks so cute, and it makes me smile every time I see it when we pull into our subdivision.  I got the idea from this awesome website that has all these great things you can do with a wood pallet.  It was easy too.  Once you get the pallet torn down into pieces (for an easy how-to visit this video), you simply lay out your seven pieces side-by-side and begin to paint.

Here's a fun fact, regardless of if the flag is to be displayed horizontally or vertically, the blue should be in the top left.

Red is supposed to begin and end the flag, but I think I can be forgiven for a DIY error.

Did you know that the 13 stripes represent the original 13 colonies? 
   That's enough flag trivia for one evening.  Now let's move on to another DIY project I've been working on.  This was pretty fun.  I did this at work, so I had a bunch of power tools at my disposal.  That was way more fun, and possibly more frightening to my co-workers, than I could have thought possible.  The result was pretty good too.


They love their new bed.
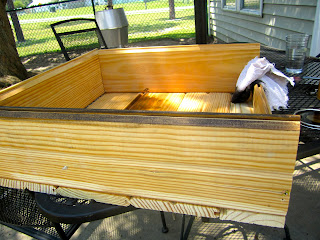
   I could have used a wood pallet for this project too, but on one of my last days at work, I discovered a beautiful piece of wood trim in the trash, and my boss told me I could have it if I wanted.  It was enough to make two dog beds.  One was about 3 1/2' x 3 1/2' and the other was 1 1/2' x 1 1/2'.  The bigger one, as you can see, is big enough for both my dogs.

   I used seven 1 1/2' pieces for the small bed, one of which I cut in half lengthwise.  For the larger bed, I used 10 1/2  of the 3 1/2' pieces.  I put them all together like so:


Then I stained them a nice dark brown.


 We had gotten new living room furniture the week before, and I had the foresight to keep the cushions from the old couch, so that's what I used as padding for the bed.

The old cushions.

Remove the covers.

Cut down to size.

I found an old fitted sheet, and cut it to fit around the cushions, and...

Ta-Da!
Unfortunately, Andouille outgrew the small bed the day I finished it, so I gave it to my older sister for their small dog.  Now Andouille shares with Roux.

I'm using the term "shares" loosely.  He may be small, but he fights dirty.


Mine!


   You know when I came up with the title for this blog entry, I thought I could type up a cute, funny, but bitingly sarcastic story of how I asked J to do something, and he did, but failed, so I had to do it myself, but for the life of me, I couldn't think of a thing!  I know that's happened before, but I can't remember any specifics.  Perhaps this looming deployment has me going soft and mushy.  I can't even think of a single thing J did wrong today.  What's wrong with me?  

   Ah well, I guess I need to get off of here and go congratulate my loving husband on not being the center of my latest post.  Goodnight all!

Friday, June 8, 2012

Movie Night

     I've decided that I'm a wimp.  My daughter and husband left at about 2:00 this afternoon to join my mother and father-in-law at their home for a weekend of fishing and fun.  I stayed behind for a bit of quality sister time, and although I'm immensely enjoying my one-on-one time with my baby sister, I'm also missing my little family already.  My daughter just called me for her "nigh-night" kiss, and I almost cried!  She was so sweet, and it just made my heart ache to think that I'm missing out on a real goodnight kiss.  I think I'm going soft.

    Ah well, like I said, I'm enjoying spending a bit of quality time with my little sister.  Well, I should say "younger sister" considering she won't be my "little" sister for too much longer.  She's already close to my height, and she's only 15!  Well, anyway, it's raining here, so we couldn't go to the beach like she had asked, so instead we had a movie night.  After dinner, we made Caramel and Candied Popcorn and watched Abducted (her pick).  She wanted to watch it because it starred Taylor Lautner.  Coincidentally, that's exactly why I didn't want to watch it.  She won out though, and got to enjoy her five minutes of shirtless-Taylor-Lautner-oggling.  That's honestly all I think she remembers from the movie, as a matter of fact.  Ah, to be young and obsessed with mediocre celebrities!

   Well, at any rate, the popcorn was a big hit where the movie was a flop.  My little sister had fun helping me make (and eat) it.  Here are the recipes so you can try it too :-)


Salted Caramel Popcorn
1 batch stove-top popping corn (popped according to direction on back of the package)
1 stick butter
1 cup light brown sugar
1/4 cup light corn syrup
1 tsp salt
1/4 tsp baking soda
1/4 tsp vanilla extract

In a small saucepan, melt butter over low heat.  Add brown sugar and syrup.  Stir until mix, and then let sit on heat for about five minutes or until an auburn color.  Remove from heat.  Add vanilla, salt and baking soda.  Let cool for a couple of minutes.  Then pour over popcorn.  Mix thoroughly.  Spread onto baking sheet.  Bake at 275 for 30 minutes, stirring occasionally.  Let cool completely on wax paper.


Candied Popcorn
This one would be the perfect thing to get rid of all the left-over Halloween candy.

1 batch stove-top popcorn
4 pieces Baker's white chocolate bark, chopped
Your favorite candy; you can use M&M's, Resees Pieces, Ande's, Snowcaps, etc.  I let my little sister pick, so we ended up with these:

Whoppers and Mr. Goodbar

 Yeah, that's what happens when you put the teenager in charge of snacks. ;-)

So here's what you do:

Make you popcorn according to the directions on the package, set aside.  Melt the white chocolate in the microwave at 30-second intervals.  Drizzle the white chocolate over the popcorn, stir until coated.  Add your candy.  Stir some more, and then spread onto a backing sheet before popping in the fridge (or freezer) to harden.  Yum!

Well, this tired Mama is going to go shower and head to sleep because I just realized that for the first time since my child was 18 months old, I'm looking forward to a morning where I will not be awoken before 8 am.  :-D

Wednesday, June 6, 2012

Father's Day Idea


Isn't this the cutest Father's Day card ever?  My sister was a genius to suggest we make use of the local beaches, her minor in photography, and my daughter's modeling aspirations!  Plus, (with the help of Shutterfly) I was able to make this perfect keepsake for my husband.  The best part is it's small enough that he can tote it around with him while on deployment.  I'm sure it will be a big hit.  Also, we were able to make "Pawpaw" cards by having my daughter and godson spell out "I <3 U".  Now I just have to keep my husband and stepdaddy away from my blog until after Father's Day.


Also, since my husband is an avid coffee-drinker, I couldn't resist making a personalized mug, especially since it spells out "D-A-D" in such a cute manner.  I think I may have to go back and make a cute mug for me too. :-)