Saturday, December 28, 2013

Breaking in my Christmas Gifts

     I hope everyone here had a wonderful Christmas.  I know we certainly did.  We spent 3 days back home, and it was just enough for Monkey to stock up on what looked like a year's worth of toys and clothes.  As much as I enjoy my visits home, I always look forward to being back in my own house, and especially in my own kitchen.  This year for Christmas my amazing husband surprised me with a bread machine under the tree!  He joked that with this I could make bread, and still be able to use the oven to cook him dinner.  I know I may sound like someone out of the dark ages, but I was amazed how easy it was to dump the ingredients in the pan and let it do it's thing.  I kept running back to it to make sure it was all okay.  I'll admit, I was a little hesitant to believe that the bread would come out as good as my hand-kneaded with love recipe, but much to my amazement, it was better!  So here's the recipe I used for my bread machine to make a 1.5 lb loaf of white bread:


1 cup warm water
3 TBS vegetable oil
3 TBS white sugar
3 cups all-purpose flour
1 1/2 tsp salt
2 1/4 tsp active dry yeast

Dump your liquid ingredients into the pan first.  Next add the dry ingredients, saving the yeast for last.  You don't want your yeast to touch the liquid ingredients.  Place the pan into your machine and set it to Basic (or White Bread, depending on your machine).  Let cool on wire rack before slicing.

    You have no idea how excited I was that the bread just did its own thing while I was able to scurry around the house, putting away all our other holiday goodies!  Another present I was excited to try out was my first ever cast iron skillet!  I've been wanting one for a long time now, so when I opened the present from my Grandma, I couldn't wait to get it home to break it in.  After the initial breaking in of the skillet, per my step daddy's directions, I decided to try it out on breakfast.  We always have grits and eggs for breakfast on the weekend, and I always have leftover grits.  Instead of throwing them out, I made these yummy grits cakes: (The following comes from Paula Deen's Southern Cooking Bible)


When you make grits, pour your leftovers into a widemouth mason jar or another cylinder container.


Let them sit in the fridge overnight.  When you're ready to make breakfast, pull them out and run an offset spatula or thin knife around the edge to loosen them from the container.


Slice the grits "log" into 1/2" slices.


Heat some butter (I used 3 TBS per batch) in a skillet, and add grit cakes.  Cook 3-4 minutes per side or until golden brown and heated through.


Enjoy :-)

And now I'm off to break in yet another Christmas present: The Big Bang DVDs

Wednesday, December 18, 2013

The Creature Who's Stirring

     It's that time of year.  The time when everyone on your Facebook friend's list who has a kid is blowing up your newsfeed with pictures of that dang Elf on a Shelf.  At least I'm nice enough to post them all here so that you have the option of scrolling through them.  You're welcome :-)

     The day after Thanksgiving, Elman (our resident Elf on the Shelf) made his reappearance rather dramatically by wrapping all our room doors and the front door in wrapping paper.  Monkey found him like this the next morning.


Once Elman had been around for a few days, The Justice League decided to call him in for questioning.  There must have been a struggle because they saw the need to restrain him.


     Once Monkey explained to her toys that Elman was on a secret mission from Santa himself, they decided to free him so he could return to the North Pole.  Elman came back and taught the Justice League a lesson in Christmas cheer by wrapping them up like presents.


     The Justice League and Elman finally made a truce and even became buddies while bonding over a rousing game of Trouble.

My favorite part is that Batman seems to have drawn the short straw and got the pink pegs.
     After all those nights of coming to terms with the locals, Elman decided to take a break, veg out, and enjoy Christmas specials.


     After a night of recuperating, Elman went back to work.  This time he decorated the Christmas tree with Monkey's panties!


      Elman noticed on his visits that Monkey was struggling to take care of her household chores, so he got permission from Santa to bring her one of her gifts a bit early.  One morning he showed up with a Responsibility Chart for her.

     Elman seemed to have a very calm, enjoyable evening coloring in one of Monkey's Christmas coloring books, but Monkey wasn't happy to find him sitting in her little desk where she likes to color.


      It took Monkey forever to find Elman the next day.  She finally noticed him standing in a light fixture above the stairs.  I guess he took it to heart when she said he was in the way the day before.


     Apperantly when Elman went looking for a midnight snack one evening he was severely disappointed, so we took it as a sign to bake some cookies.


     That day we made cookies just so Elman could get his fix when he came back from reporting to Santa.

     Next, I sent Elman on a secret mission to find out what J got me for Christmas.  He got in, but then he wouldn't talk.  Darn elf must have been paid off.


     Next Elman must have gone to some wild Christmas party or lost a bet, because this is how we found him the next day.

I feel pretty, oh so pretty...

     Over the past few months  J has made a personal goal to introduce Monkey to as many heroes as possible.  This means we've been having a ton of 90s flashbacks, because J insists Monkey must see the "classics", i.e. The X-Men from the 90s, The Avengers from the late 90s/early 2000s, The Justice League from the early 2000s, and the most recent addition, Spiderman from the 90s.  Elman must have been watching too, because this is how we found him one morning:

Spiderelf, Spiderelf, radioactive spiderelf
     I know it's not Christmas yet, but I'm going to wrap these up today simply because I will be busy over the next few days doing all the last-minute prep for Christmas, but I have to share one more before I go.  This one is my absolute favorite, probably because I required no help from Pinterest ;-)

Elman wrote on Monkey's bathroom mirror with Window Crayons.

Elman made it so that when Monkey looks in the mirror she magically grows elf ears, elf hair, elf glasses, an elf  nose, and even sticks out her elf tongue.  Then he wrote, "You've been elfed".

I think she enjoyed it.

     And for a little more Christmas fun for your little one, print out this Scavenger Hunt List I made for Monkey.  We used it to find different decorations people had on display around base.  It was a lot of fun.  I popped popcorn and poured eggnog, and we bundled up in the car and drove around hunting for all the things on the list.  *It looks like the last few words got pushed to another page, but if you download the file and then print, the words magically go back to where they're supposed to be.  I don't understand computers sometimes.*

Friday, December 13, 2013

I Like to Balance out my Good Grades with a Little Dumb-Assery, Just to be Fair

     You know, I make pretty good grades in school.  I always have.  I'm not claiming to be super smart or anything; I'm just really good at taking tests.  I know that some of y'all on my Facebook feed are probably getting sick of the "WooHoo! I made a 4.0 this semester" or "Guess who made a 100 on her first exam!" statuses, but school is what is relevant to me right now, so that's what I talk about most.  To be fair, though, I've decided that if I'm going to announce to the world that I made a 100 on my first Pharmacology test, I also have to announce what a dumbass I made myself out to be in Intro to Nursing last night.  Life is about balance, right?

     So last night after our first test, our teacher was going through her lecture about administering medications.  When she got to the point about injections, she split us into groups so we could all handle the needles, syringes, and "insulin" (which was really sterile water) in order to get a feel for drawing up medications.  Now, my mom got me some practice needles a while back, but honestly I was a little nervous to try them on my own, so I've never handled a needle before.  I've also heard scary stories of needle sticks from patients who have HIV, so of course I was a little apprehensive and aware of the importance of needle safety.  Yet, somehow last night when the teacher told us to draw up 2 mL of "insulin" my excitement clouded out everything else, and I jumped at the chance to claim a needle and get going.  The problem started when I couldn't get the cap off the darn thing.  I tried exerting minimal force, but the cap just wouldn't budge.  Feeling the eyes of the two other girls in my group boring into me as I struggled with the stupid thing, I finally decided to give a quick jerk to release the needle from its prison.  It was effective and overkill because the needle shot backwards out of the cap, and then forwards into the index finger of my left hand.  I just sat there, stunned for a sec on as the blood began for bubble up out of my finger.  Thinking I'd recover quickly, I stood up to grab my jacket with the intent of holding that over my wound to disguise it and stem the flow of blood.  As I stood, however, the teacher caught sight of me (and my now bleeding profusely hand) and came swiftly over.  Her look of horror just made my brain stall, so when she asked me if I wanted to go to the bathroom, I just stood there for a second wondering why she would want me to go pee at a time like this, but then it clicked, and I scurried off before any of my fellow classmates, besides the girls in my group, saw that my hand was now dripping blood onto the table.

     As I sat in the bathroom, watching the sink turn red from a tiny needle stick I tried to think of ways to recover from this clear display of incompetence.  Unfortunately, I got nothing.  Finally I stemmed the flow of blood, and I returned to class with my tail firmly tucked between my legs.  I decided to steer clear of the needles at first, but then I finally got up the courage to try again.  This time everything went smoothly, and I only had to endure one joke from my classmate about being careful where I pointed the thing after I had successfully drawn out my 2 mL.  I think it was warranted.  Luckily class let out soon after that because my finger had swollen to three times its normal size and was throbbing.  As I was packing up to leave, I offered to help my teacher pack away the needles and insulin, but she told my "No thanks" in what I'm hoping was just a normal voice, not a panicky, "Dear God don't let her near those things again" way.  My last attempt at redeeming myself involved a little humor as I told her, "Well I've been really worried about needle sticks in the hospital, so I just decided to get it out of the way in your class."  She gave me what I took as a look of pity, although it could have been a withering look of "I just wrote you down as the first to flunk out of this program".  O.o

     On a more serious note, though, through the whole thing I kept remembering this one phrase someone said about Nursing school.  They didn't remember the tests they made 100's on or the questions they got right.  They remembered the screw ups, the bad calls, the mistakes and they never made those again.  I don't think I'll ever be so careless with a needle again.

     You know I can't let you go without a recipe, so here you go:


Family Favorite Chicken Kabobs
from Allrecipes.com

1/4 cup vegetable oil
1/3 cup honey
1/3 cup soy sauce
1/4 tsp gr. black pepper
4 boneless, skinless chicken breasts, cut into 1-inch cubes
2 cloves garlic
4 small onions, cut into 2-inch pieces
1 red bell pepper, cut into 2-inch pieces
1 green bell pepper, cut into 2-inch pieces
1 can pineapple chunks, drained
12 skewers

In an extra-large bowl mix oil, honey, soy sauce, and pepper.  Reserve a small amount for later to brush over the kabobs.  Add in chicken, garlic, onions, bell peppers, and pineapple chunks.  Let marinade for at least 2 hours.

Drain marinade, and thread chicken, vegetable, and pineapple pieces onto the skewers.  Lightly oil the grill.  Cook 12-15 minutes on high heated grill until juices run clear.  Turning and brush with reserved marinade frequently.

Enjoy.  Now I'm off of here, because typing makes my finger hurt worse :-/

Wednesday, December 11, 2013

These are Better That MRE's

     I have a Nursing exam tomorrow.  I also have a Psychology midterm on Tuesday.  Oh, and let's not forget the 15 page paper that will be hanging over my head until some time in January.  Yet all I want to do is take a nap with my cuddly new kitty, Bruce.  I think it's this time of year.  It's not even that cold out, but I find myself wanting to hibernate until March.  But, there's too much to be done, and so little time to do it all.  The holiday rush is making me feel the pinch, but my husband's looming deployment is also making me want to squeeze in as many activities as possible, so we have a plethora of fun memories to sift through as the months until he comes home pass slowly by.  And of course, I'm still cooking up a storm.  I like to fill J's last couple of months with us with a mixture of his favorites and new dishes I know he'll enjoy so that he'll appreciate my cooking even more when he is living off of galley food and MRE's.  ;-)

     I found this new recipe in my Country Cooking book, and it was really good.  It would make a great  game-day food for a football party or a small gathering.


Crab Melt Loaf
1 lb imitation crabmeat, chopped
1/2 cup mayonnaise
1/4 cup thinly sliced green onions
1/4 cup diced celery
2 cups (8 oz) shredded mozzarella cheese
1/8 tsp salt
1/8 tsp pepper
1 (1 lb) loaf unsliced French bread, halved lengthwise

In a bowl, combine the first four ingredients.  Stir in cheese, salt, and pepper.  Spread over bottom of bread; replace top.  Wrap in a large piece of heavy-duty aluminum foil.  Bake at 400 degrees for 20 minutes or until heated through.  Cut into 8 slices.

Enjoy
     Now that I feel slightly productive for posting a blog, I'm going to keep this tremendous momentum going by flipping through some notecards for tomorrow's test.

Thursday, November 21, 2013

10 Thanksgiving Crafts

     Since my 31 Crafts of Halloween did so well, I think I'll make another list of Ten Turkey Day Crafts.

1. Thankful Tree---Using brown constriction paper, cut out the tree.  Cut leaves out in red, orange and yellow.  Tape the tree to your wall, and everyday have your little one write (or say) something they're thankful for on a leaf and tape the leaf to the tree.


     I've seen these on Pinterest a few times, so last year they became a part of our Thanksgiving tradition.  I think it's a great way to make your child consider all that they have to be grateful for, and I think it's fun and sometimes surprising to hear what Monkey comes up with.

2.  Thanksgiving Puzzle--- I did this one with my daughter anther two friends one night last year when I was babysitting, and they seemed to enjoy it.  Click this link to print out the puzzle.  Have your little one color it, and then cut out the puzzle pieces, and have them assemble it.  To make the pieces more sturdy glue them to card stock or construction paper before cutting them out.


3.  Hand Turkey--- Have your child trace his/her hand on brown, red, orange, and yellow construction paper (you'll need 2 hands in each color).  Cut out.  Trace and cut out a bowling-pin shape from brown construction paper for the turkey's body.  Have your little one glue the brown hands to the front of the turkey, and the red, orange, and yellow hands to the back of the turkey to make feathers.  Create a face using googly eyes, orange constructions paper for the beak, and red construction paper for the gobble.  Add a couple of orange feet, and voila!


4.  Leaf Turkey---  For this craft, take your little one on a nature hike, and have him/her collect a variety of leaves.  When you get home, cut out one large circle and one small circle from brown construction paper.  Cut out a beak and feet from orange construction paper.  Have your little one assemble the turkey by glueing the leaves to the back of the large brown circle.  Glue the body and feathers onto another sheet of construction paper, and add the small circle for the head.  Add googly eyes (or eye), beak, and feet.


5. Turkey Game---  This fun game can be found here.  It's a free printable, and Monkey loved it. Every number you roll determines which part of the turkey you draw.  The first one to finish his/her turkey wins!


She won!


6. Pinecone Turkey--- This one requires another nature hike to find pinecones (unless you're like me and have many pine trees dropping needles and cones into your back yard).  Once you've found some good ones, bring them home and cut out orange, red, and yellow "feathers" to glue to the back of them.  You'll also need two small orange triangles to form the beak.  Cut out two small circles (in any color) for the eyes.  Have your little ones assemble them with some glue, and you're all set.

I love our slightly drunk-looking turkeys.  Also, they remind me of the penguins on Madagascar.
Tired of turkey?  Well here you go:

7. Scarecrow--- For this one you'll need a paper plate and yellow, red, pink, orange, and blue construction paper.  Cut out two small blue circles for eyes.  Cut out two medium-sized pink circles for cheeks.  Cut out an orange triangle for the nose.  Cut out "straw" from the yellow to go under the hat.  Also trace your child's hand twice onto the yellow, and cut those out for the "straw" under the face.  Cut out a hat from the red.  Help your little one assemble the scarecrow as seen below.  Don't forget to draw the smile.


Since we're taking a turkey break, try out this cutesy craft next:

8.  The Mayflower---  This craft is a good way to start a conversation about the history behind Thanksgiving.  (That's right; it's isn't all about the turkey.)

This one is from two years ago.  Monkey's hands were so small :-(

Have your little one dip their hand in black paint and press it onto a sheet of light blue constructions paper.  Once the handprint dries have them add the little details like the waves and sails.

9.  Pipe-cleaner Turkey---  So, it may not all be about the turkey, but considering that it's a big part of most people's Thanksgiving, here's another cute turkey craft.


If you buy the Natural Fuzzy Sticks craft pack at Wal-Mart, the instructions for this turkey is on the back, but here they are anyway:

You'll need:
3 light brown pipe cleaners
2 dark brown pipe cleaners
2 green pipe cleaners
2-3 red pipe cleaners
2 googly eyes
1 triangle cut out of orange construction paper
Glue and scissors

To form the turkey's body, take one light brown pipe cleaner and tightly coil it so that it forms a large circle.  To form the head, coil another light brown pipe cleaner in the same way.  When you have 1/4 of the pipe cleaner left, wrap it around a portion of the body to form a neck. Glue the googly eyes and triangle to the head.  Cut a small piece off of one of the red pipe cleaners, and attach it to the face, under the triangle beak.  To form the first feather, attach a green pipe cleaner by wrapping one end around the side of the body, form a U with the green before wrapping the second end around the body.  Do the same with the remaining pipe cleaners for form all the feathers.  Cut the remaining dark brown pipe cleaner in quarters.  Attach one quarter to the bottom of the body, and bend part of the end to form one toe.  Repeat  with another quarter to form another foot.  Use the remaining quarters to cut out and attach two more toes on each foot. 

Need something less time consuming? Try this:

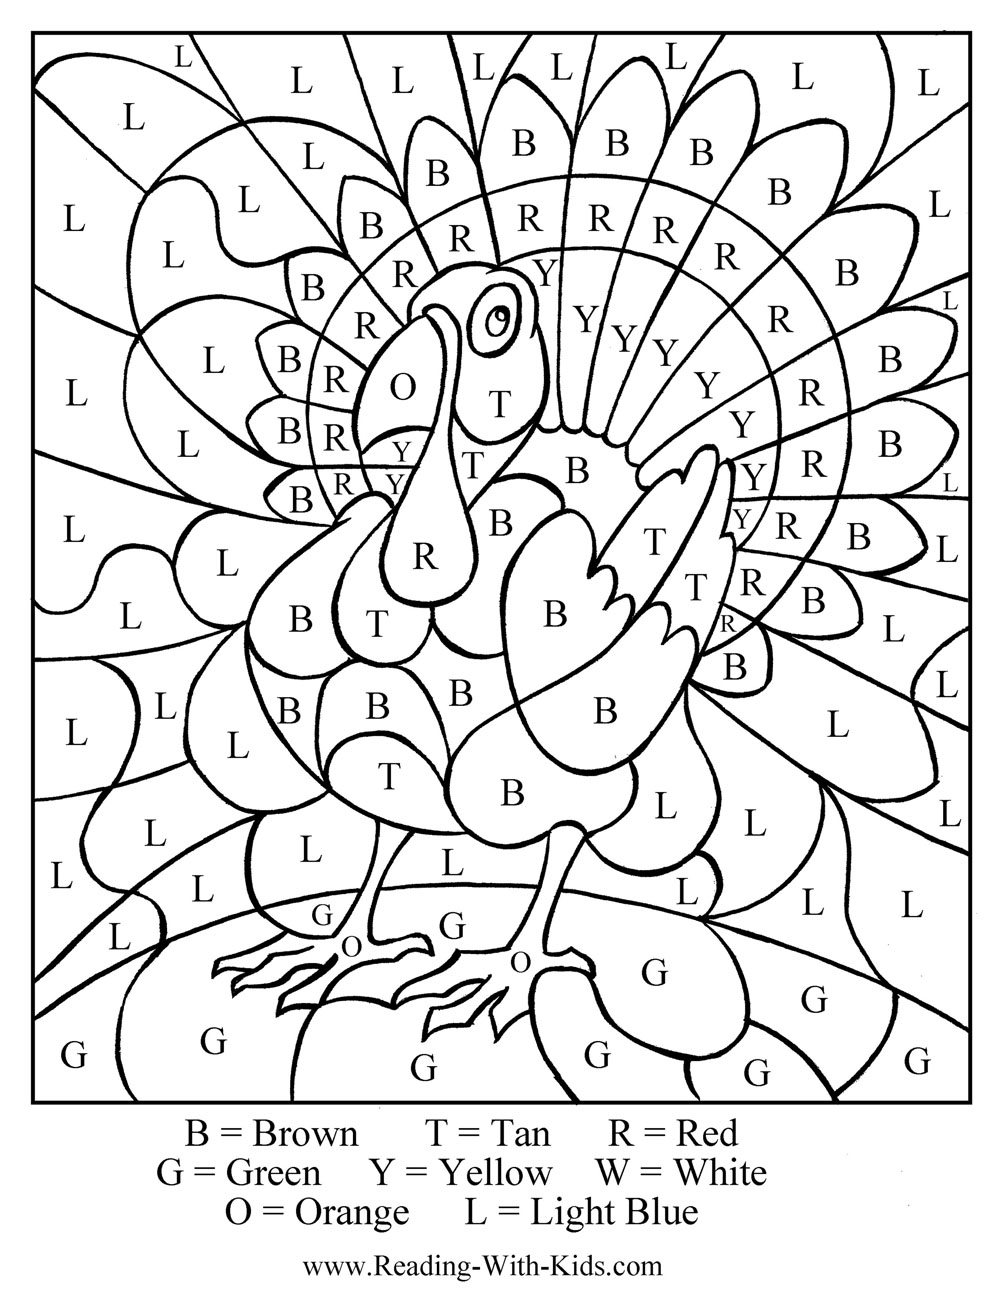
10. Turkey Color-by-letter--- Simply click this link, print out the turkey, and have your little one color it in.  No fuss, no mess, no problem :-)


Sunday, November 17, 2013

It's Good to be Needed

     This past week I started another semester at WCU, but this one is a bit different that any other before.  I'm finally moving into the Nursing program, and we have hit the ground running.  It's an adjustment to say the least, but it's one I'm enjoying.  I've never been one to study much, I was blessed with the ability to excel academically with minimal effort, but it seems those days are behind me.  Every morning I wake up two hours before my family to get in a few chapter's worth of studying.  When Monkey wakes up I fix breakfast for all of us and play catch up on housework.  I spend what time I can with my family before I cook dinner.  After dinner I lock myself back in my study to finish up what I can while J bathes Monkey and gets her ready for bed.  We do bedtime stories as a family and then J and I go to sleep.  It's been a huge reversal from my normal schedule of doing whatever I want with my daughter whenever I wanted.  My time with her is limited lately, and I know once clinicals start that time will shrink again, so I've been stressed out about the idea that she'll learn to do without me or won't want me around as much.  Even when J tried to sooth my fears and explain that they were unwarranted, I still was brought to tears last night when she seemed completely uninterested in my presence at bedtime, but was all about her daddy.  I knew that was a good thing, but I couldn't help but feel replaced.

    Thankfully it didn't take long to be reminded that she still needs me.  In the middle of the night she came into our room, and I thought she must of had an accident, so I started to wake J to take care of it (it was his turn), but then I heard, "Mommy, I had a nightmare", and I knew couldn't pass this off, nor did I want to.  I enjoyed walking her back to her bed, tucking her back in, praying with her for better dreams, and soothing her back to sleep.  It was definitely the reminder I needed to let me know that no matter how much other stuff comes into my life, my daughter is my priority, and even if I'm busier than usual, as long as I make sure to remind her daily of her importance to me, she'll understand why I can't be there 24/7.

  Now you must be wondering why I'm on here if I'm worried that I'm not spending enough time with my baby girl, and the answer is simple: my child would rather watch the Justice League than play with me.  She doesn't mind if I sit next to her, though, so here I am.  And while I'm here I might as well share a recipe, so here you go:


Mediterranean Baked Chicken
from The Clever Carrot

For the marinade you'll need:
1 1/2 lbs boneless, skinless chicken breasts
2 garlic cloves, thinly sliced
2-3 TBS marinade from artichokes
4 springs fresh oregano, leaves stripped

For the bake you'll need:
2 small red onions, thinly sliced
1 pint grape or cherry tomatoes, left whole
1 (14 oz) jar marinated artichoke hearts
1 (14 oz) can northern white beans, drained and rinsed
1/2 Kalamata olives, pitted
1 small tub marinated bocconcini (I just learn these are tiny mozzarella balls, and they're yummy!)
olive oil
salt and pepper
Garnish with fresh basil and parsley to taste

Drain artichoke hearts, reserving its juice in a small bowl.  Pat artichokes dry with a paper towel; set aside.  In another bowl or in a gallon-sized bag, add 2-3 TBS reserved artichoke marinade, oregano, and garlic.  (If you still have extra artichoke juice, save it to drizzle over the dish when finished baking.)  Cut chicken into 1 1/2 inch strips; add to bowl/bag.  Drizzle with olive oil, and mix well to coat.  Marinate 1-3 hours.

Preheat oven to 400.  In a large roasting pan, place onions and tomatoes.  Toss with olive oil, and season with salt and pepper.  Cook, stirring occasionally, until onions are soft and tomatoes begin to burst (about 15-20 minutes).

Meanwhile, in a large skillet warm 1 tsp oil over moderate hear.  Brown the chicken on both sides, working in batches.  The chicken will be slightly undercooked.

Remove roasting pan from oven.  The onions should be soft and sticky.  If not, cook another 5 minutes.  Add chicken, artichoke hearts, beans, and olives to the pan.  Roast 5-7 minutes or until chicken is cooked through.

Meanwhile chop bail and parsley if using.  Remove chicken from oven.  Add bocconcini and herbs; toss gently to combine.  Drizzle with olive oil and extra artichoke juice if desired.

Enjoy!

   This was so good.  It was easy to throw together, but was "fancy" enough for company.

Friday, November 8, 2013

I Can't Come Up with a Witty Title Before I've had my Coffee

     You know what I discovered last night?  My husband is extremely competitive!  I was up all night because he wouldn't let me go to sleep until he had won a round of cards.  I kept winning which meant we kept staying up.  Finally I had to cut him off for my own sanity.  I passed out, exhausted, at 1:00 am only to be awoken at 7:00 by a four-year-old Howler Monkey who was calling to the moon or something.  Today requires coffee.

     Thankfully my competitive J has decided to make it up to me by making breakfast and coffee :-)  I think I'll keep him.  I've been so preoccupied with Christmas projects that I haven't really felt like cooking.  Shocking, I know, but I have some really fun crafts I'm working on right now, which I'll share later.  In the meantime my dinners have been a little more thrown together than usual, but that's okay because I found a new favorite for a quick weeknight meal.  I saw a picture of these on Pinterest, and decided to try it.


Cornbread Waffles

1 box Jiffy cornbread mix (this was just enough for J, Monkey and I; you may need more if you have a bigger family)
2 cans of your preferred chili (or click here for an awesome crockpot recipe)
Toppings such as lettuce, diced tomato, cheese, salsa

Mix Jiffy according to directions on package.  Cook in waffle maker according to instruction that came with your waffle maker.  Meanwhile heat up chili.  When the waffle is cooked, spoon chili on top and add desired toppings.

Enjoy :-)

     This meal literally takes under 10 minutes to make, and J and Monkey love it!  It's perfect so that I can feed my restless natives and still manage to get back to my craft room in record time.

     One of the crafts I'm working on is an Advent calendar.  We had one as a kid, and I remember my sisters and I taking turns each day moving our little mouse into a new pocket until Christmas day.  I've been wanting to make one for Monkey, but I could find a cute enough template.  Last night (in between card games) I started finding ideas for one.  I had never heard of a Jesse tree before, but after seeing this one on another blog, I decided that's what I want to do.  I like the idea of each ornament teaching another part of the Bible that led up to the birth of Christ.  I'm not using her pattern (sorry, $52 dollars for a craft kit? No thanks.), but I do like the idea.  I'll let y'all know how it turns out.  :-)